Chế tạo máy đo nhịp tim (Pulse Sensor) cảnh báo qua còi với Arduino
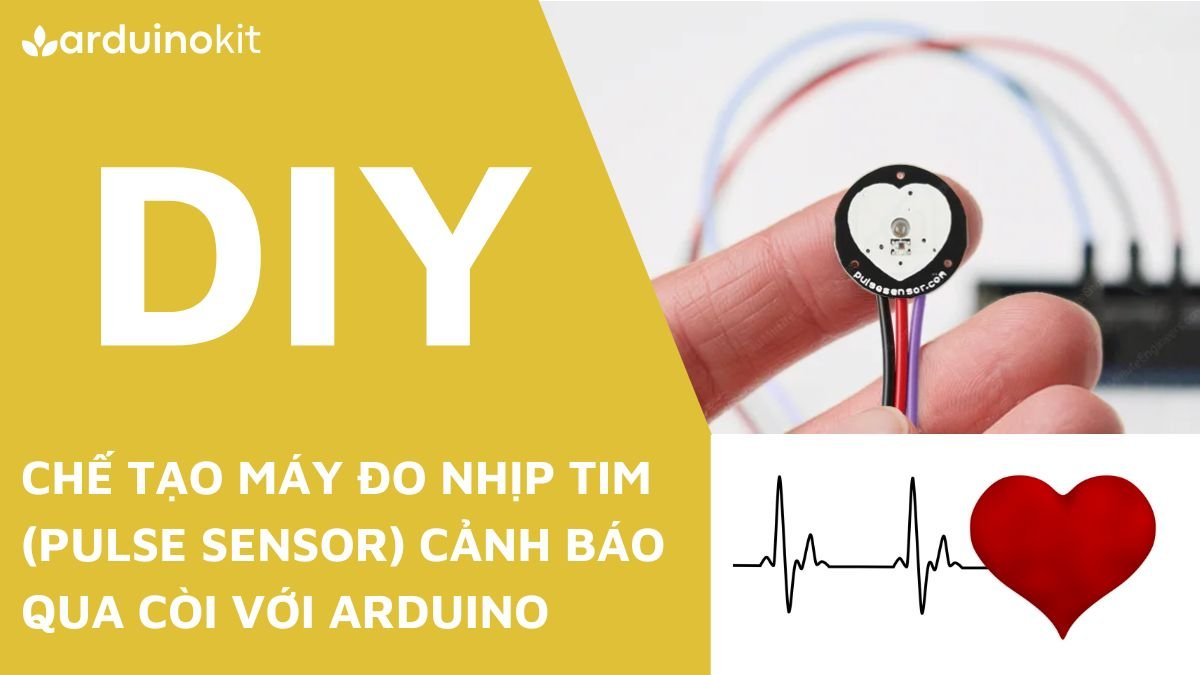
Chế tạo một máy đo nhịp tim (Pulse Sensor) có chức năng tạo ra tiếng ‘beep’ theo nhịp tim là một dự án thú vị. Trong dự án này, chúng ta sẽ sử dụng một Pulse Sensor để đo nhịp tim và một loa kết hợp với Arduino để tạo ra tiếng ‘beep’. Khi nhịp tim vượt quá một ngưỡng xác định, loa sẽ phát ra một âm thanh beep theo cảm biến nhịp tim.
Đây là một ứng dụng đơn giản nhưng hữu ích, có thể được áp dụng trong nhiều lĩnh vực như chăm sóc sức khỏe và tập luyện. Trong phần tiếp theo, chúng ta sẽ đi vào chi tiết cách chế tạo và lập trình máy đo nhịp tim cảnh báo qua còi với Arduino.
Tổng quan về cảm biến nhịp tim (Pulse Sensor)
Mặt trước của cảm biến đo nhịp tim có hình dạng giống logo trái tim và được thiết kế để đặt ngón tay lên. Trên mặt trước cảm biến có một lỗ tròn nhỏ, và bên trong lỗ này có một đèn LED màu xanh lá cây của Kingbright.
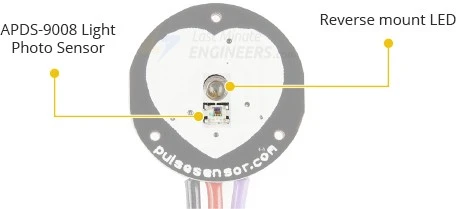
Ngay phía trên lỗ tròn, có một cảm biến ảnh ánh sáng APDS-9008 của Avago. Cảm biến này hoạt động tương tự như cảm biến được sử dụng trong điện thoại di động, máy tính bảng và laptop để điều chỉnh độ sáng của màn hình dựa trên điều kiện ánh sáng xung quanh.
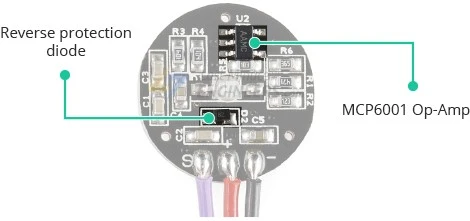
Ở mặt sau của module, có một Op-Amp MCP6001 của Microchip và một bộ lọc R/C. Bên cạnh đó, còn có một diode được sử dụng để bảo vệ khỏi việc cắm nguồn sai.
Module này yêu cầu nguồn điện DC từ 3,3 đến 5V và dòng điện tiêu thụ dưới 4mA.
Xem ngay: Hướng dẫn sử dụng cảm biến nhịp tim (Pulse Sensor) với Arduino
Linh kiện cần thiết cho dự án
| TÊN LINH KIỆN | SỐ LƯỢNG | NƠI BÁN |
| Arduino Uno R3 | 1 | Shopee | Cytron |
| Cảm biến nhịp tim (Pulse Sensor) | 1 | Shopee | Cytron |
| Loa 8 ohm | 1 | Shopee | Cytron |
| Điện trở 1K | 1 | Shopee | Cytron |
| Điện trở 470R | 1 | Shopee | Cytron |
| LED 5mm | 1 | Shopee | Cytron |
| Tụ phân cực 10uF/50V | 1 | Shopee | Cytron |
| Breadboard | 1 | Shopee | Cytron |
| Dây cắm (Đực – Đực) | 10 – 20 | Shopee | Cytron |
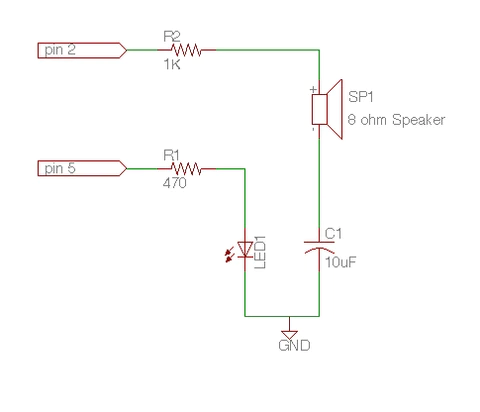
Sơ đồ đấu nối

Sơ đồ nguyên lý, các bạn có thể tham khảo, lưu ý cần đấu nối các linh kiện giống như mạch, để hạn chế nhiễu gây ra cho cảm biến nhịp tim.
Cài đặt thư viện
Để có thể giao tiếp với cảm biến nhịp tim, bạn cần cài đặt thư viện ‘PulseSensor Playground’.
Truy cập vào Arduino IDE và chọn Sketch > Include Library > Manage Libraries…

Trong cửa sổ thư viện Arduino IDE, nhập từ khóa ‘pulsesensor’ vào ô tìm kiếm.
Tìm thư viện ‘PulseSensor Playground’ trong danh sách và nhấp vào nút “Install” để cài đặt thư viện.
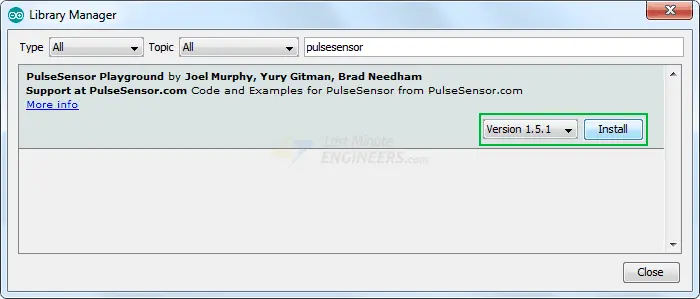
Sau khi hoàn tất quá trình cài đặt, bạn đã sẵn sàng để sử dụng thư viện ‘PulseSensor Playground’ để giao tiếp với cảm biến nhịp tim.
Code cảm biến nhịp tim (Pulse Sensor)
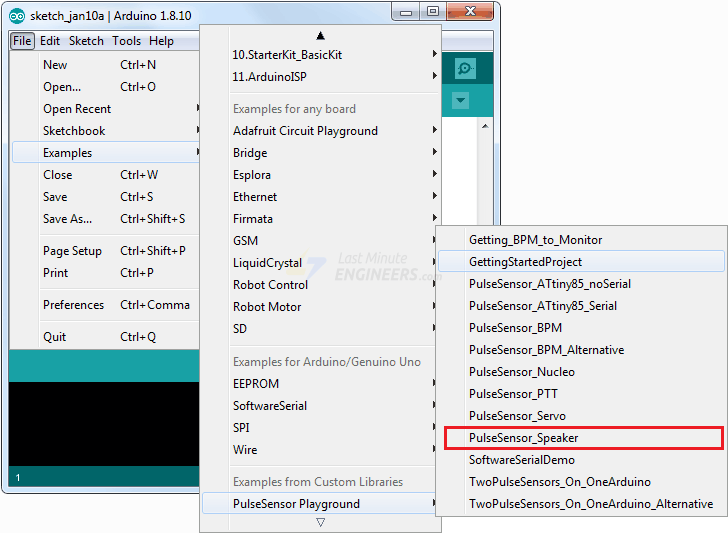
Các bạn truy cập vào đường dẫn sau để lấy code nhé: File > PulseSensor Playground > PulseSensor_Speaker
/*
   Code to detect pulses from the PulseSensor,
   using an interrupt service routine.

   >>>>  THIS EXAMPLE OUTPUTS USES TONE COMMAND <<<<
   >>>>  TO MAKE A SPEAKER BEEP WITH HEARTBEAT! <<<<

   Here is a link to the tutorial
   https://pulsesensor.com/pages/pulse-sensor-speaker-tutorial

   Copyright World Famous Electronics LLC - see LICENSE
   Contributors:
     Joel Murphy, https://pulsesensor.com
     Yury Gitman, https://pulsesensor.com
     Bradford Needham, @bneedhamia, https://bluepapertech.com

   Licensed under the MIT License, a copy of which
   should have been included with this software.

   This software is not intended for medical use.
*/

/*
   Every Sketch that uses the PulseSensor Playground must
   define USE_ARDUINO_INTERRUPTS before including PulseSensorPlayground.h.
   Here, #define USE_ARDUINO_INTERRUPTS true tells the library to use
   interrupts to automatically read and process PulseSensor data.

   See ProcessEverySample.ino for an example of not using interrupts.
*/
#define USE_ARDUINO_INTERRUPTS true
#include <PulseSensorPlayground.h>

/*
   The format of our output.

   Set this to PROCESSING_VISUALIZER if you're going to run
    the Processing Visualizer Sketch.
    See https://github.com/WorldFamousElectronics/PulseSensor_Amped_Processing_Visualizer

   Set this to SERIAL_PLOTTER if you're going to run
    the Arduino IDE's Serial Plotter.
*/
const int OUTPUT_TYPE = SERIAL_PLOTTER;

/*
   Pinout:
     PULSE_INPUT = Analog Input. Connected to the pulse sensor
      purple (signal) wire.
     PULSE_BLINK = digital Output. Connected to an LED (and 1K series resistor)
      that will flash on each detected pulse.
     PULSE_FADE = digital Output. PWM pin onnected to an LED (and 1K series resistor)
      that will smoothly fade with each pulse.
      NOTE: PULSE_FADE must be a pin that supports PWM. Do not use
      pin 9 or 10, because those pins' PWM interferes with the sample timer.
     THRESHOLD should be set higher than the PulseSensor signal idles
      at when there is nothing touching it. The expected idle value
      should be 512, which is 1/2 of the ADC range. To check the idle value
      open a serial monitor and make note of the PulseSensor signal values
      with nothing touching the sensor. THRESHOLD should be a value higher
      than the range of idle noise by 25 to 50 or so. When the library
      is finding heartbeats, the value is adjusted based on the pulse signal
      waveform. THRESHOLD sets the default when there is no pulse present.
      Adjust as neccesary.
*/
const int PULSE_INPUT = A0;
const int PULSE_BLINK = LED_BUILTIN;
const int PULSE_FADE = 5;
const int THRESHOLD = 550;   // Adjust this number to avoid noise when idle

/*
   All the PulseSensor Playground functions.
*/
PulseSensorPlayground pulseSensor;

/*
  Setup the things we need for driving the Speaker
  NOTE: Speaker MUST be AC coupled! Connect PIN_SPEAKER to red speaker wire.
        Then connect black speaker wire to + side of electrolytic capacitor.
        Then connect - side of electrolytic capacitor to GND.
        Capacitor value should be 1uF or higher!
        Follow this tutorial:
        [link]
*/
const int PIN_SPEAKER = 2;    // speaker on pin2 makes a beep with heartbeat


void setup() {
  /*
     Use 115200 baud because that's what the Processing Sketch expects to read,
     and because that speed provides about 11 bytes per millisecond.

     If we used a slower baud rate, we'd likely write bytes faster than
     they can be transmitted, which would mess up the timing
     of readSensor() calls, which would make the pulse measurement
     not work properly.
  */
  Serial.begin(115200);

  // Configure the PulseSensor manager.

  pulseSensor.analogInput(PULSE_INPUT);
  pulseSensor.blinkOnPulse(PULSE_BLINK);
  pulseSensor.fadeOnPulse(PULSE_FADE);

  pulseSensor.setSerial(Serial);
  pulseSensor.setOutputType(OUTPUT_TYPE);
  pulseSensor.setThreshold(THRESHOLD);

  // Now that everything is ready, start reading the PulseSensor signal.
  if (!pulseSensor.begin()) {
    /*
       PulseSensor initialization failed,
       likely because our particular Arduino platform interrupts
       aren't supported yet.

       If your Sketch hangs here, try changing USE_ARDUINO_INTERRUPTS to false.
       which doesn't use interrupts.
    */
    for(;;) {
      // Flash the led to show things didn't work.
      digitalWrite(PULSE_BLINK, LOW);
      delay(50);
      digitalWrite(PULSE_BLINK, HIGH);
      delay(50);
    }
  }
}

void loop() {
  /*
     Wait a bit.
     We don't output every sample, because our baud rate
     won't support that much I/O.
  */
  delay(20);

  // write the latest sample to Serial.
  pulseSensor.outputSample();

  /*
     If a beat has happened since we last checked,
     write the per-beat information to Serial.
     write a frequency to the PIN_SPEAKER
     NOTE: Do not set the optional duration of tone! That is blocking!
   */
  if (pulseSensor.sawStartOfBeat()) {
    pulseSensor.outputBeat();
    tone(PIN_SPEAKER,932);              // tone(pin,frequency)
  }

  /*
    The Pulse variable is true only for a short time after the heartbeat is detected
    Use this to time the duration of the beep
  */
  if(pulseSensor.isInsideBeat() == false){
    noTone(PIN_SPEAKER);
  }

}
Giải thích Code
const int PULSE_INPUT = A0;
const int PULSE_BLINK = LED_BUILTIN;
const int PULSE_FADE = 5;
const int THRESHOLD = 550;   // Adjust this number to avoid noise when idle
const int PIN_SPEAKER = 2;    // speaker on pin2 makes a beep with heartbeat
Khai báo các chân cảm biến nhịp tim (A0), LED (5), còi (2) kết nối với Arduino.
  Serial.begin(115200);

  // Configure the PulseSensor manager.

  pulseSensor.analogInput(PULSE_INPUT);
  pulseSensor.blinkOnPulse(PULSE_BLINK);
  pulseSensor.fadeOnPulse(PULSE_FADE);

  pulseSensor.setSerial(Serial);
  pulseSensor.setOutputType(OUTPUT_TYPE);
  pulseSensor.setThreshold(THRESHOLD);
Serial.begin(115200) khởi tạo kết nối serial với tốc độ baud rate 115200.
pulseSensor.analogInput(PULSE_INPUT) cấu hình chân Analog Input để nhận dữ liệu từ cảm biến nhịp tim.
pulseSensor.blinkOnPulse(PULSE_BLINK) cấu hình chân Digital Output để điều khiển một đèn LED nhấp nháy khi phát hiện nhịp tim.
pulseSensor.fadeOnPulse(PULSE_FADE) cấu hình chân digital output sử dụng kỹ thuật PWM để điều chỉnh độ sáng của một đèn LED theo nhịp tim.
pulseSensor.setThreshold(THRESHOLD) thiết lập ngưỡng (threshold) để phân biệt tín hiệu nhịp tim và tạp âm. Giá trị ngưỡng được đặt là THRESHOLD (trong trường hợp này là 550).
if (!pulseSensor.begin()) {
    for(;;) {
      // Flash the led to show things didn't work.
      digitalWrite(PULSE_BLINK, LOW);
      delay(50);
      digitalWrite(PULSE_BLINK, HIGH);
      delay(50);
    }
  }
Nếu pulseSensor.begin() trả về giá trị false, có nghĩa quá trình khởi tạo PulseSensor đã thất bại.
Trong trường hợp khởi tạo không thành công, một vòng lặp vô hạn được thực hiện. Trong vòng lặp này, đèn LED (được định nghĩa bởi PULSE_BLINK) sẽ nhấp nháy để hiển thị rằng quá trình khởi tạo đã không thành công.
void loop() {

  delay(20);
  pulseSensor.outputSample();

  if (pulseSensor.sawStartOfBeat()) {
    pulseSensor.outputBeat();
    tone(PIN_SPEAKER,932);
  }
  if(pulseSensor.isInsideBeat() == false){
    noTone(PIN_SPEAKER);
  }
}
Sử dụng pulseSensor.outputSample() để gửi mẫu dữ liệu nhịp tim mới nhất thông qua Serial.
Tiến hành Kiểm tra nhịp tim đã xảy ra từ trước đó hay chưa, bằng cách sử dụng pulseSensor.sawStartOfBeat(). Nếu có nhịp tim, chương trình sẽ gọi pulseSensor.outputBeat() để gửi thông tin về nhịp tim qua Serial và sử dụng hàm tone(PIN_SPEAKER, 932) để phát ra một tín hiệu âm thanh với tần số 932Hz thông qua chân PIN_SPEAKER.
Kiểm tra xem biến Pulse có giá trị false (không có nhịp tim) bằng cách sử dụng pulseSensor.isInsideBeat(). Nếu không có nhịp tim, chương trình sẽ sử dụng hàm noTone(PIN_SPEAKER) để tắt âm thanh.