Giao tiếp nhiều cảm biến nhiệt độ DS18B20 với Arduino
Trong những bài trước đó, mình đã hướng dẫn cho các bạn cách sử dụng cảm biến nhiệt độ DS18B20 một cách rất chi tiết. Trong bài viết này mình sẽ sử dụng giao tiếp 1-Write để đọc nhiều cảm biến cùng một lúc mà chỉ cần một dây (bus).
Trước khi vào bài viết, nếu các bạn thấy thông tin này là hữu ích thì đừng ngần ngại ủng hộ mình bằng cách Donate để mình có động lực ra nhiều bài viết hay hơn để phục vụ cho cộng đồng.
Đọc thêm: Hướng dẫn sử dụng cảm biến nhiệt độ DS18B20 với Arduino
Các linh kiện cần thiết cho dự án
| TÊN LINH KIỆN | SỐ LƯỢNG | NƠI BÁN |
| Arduino Uno R3 | 1 | Shopee | Cytron |
| Cảm biến nhiệt độ DS18B20 | 1 | Shopee | Cytron |
| Cảm biến nhiệt độ DS18B20 chống nước | 1 | Shopee | Cytron |
| Dây cắm | 1 | Shopee | Cytron |
| Breadboard | 1 | Shopee | Cytron |
| Điện trở 4.7k | 1 | Shopee | Cytron |
Sơ đồ đấu nối nhiều cảm biến nhiệt độ DS18B20 với Arduino
Sơ đồ đấu nối khá đơn giản. Các chân nguồn (VDD, GND) của từng cảm biến nhiệt độ DS18B20 arduino sẽ đấu nối với nguồn 5V và GND của Arduino. Chân đọc dữ liệu của ba cảm biến sẽ được đấu chung trên cùng một dây và cắm vào chân số 2 của Aruino Uno R3.
Để cho quá trình truyền, nhận dữ liệu diễn ra ổn định, các bạn cần mắc thêm một điện trở 4.7k kéo lên cho toàn bộ bus giữ tín hiệu và chân nguồn.

Cài đặt thư viện cho DS18B20
Thư viện DallasTemperature.h được phát triển nhằm giảm độ phức tạp của việc giao tiếp với cảm biến DS18B20 thông qua giao thức 1-Wire. Thay vì viết những đoạn Code phức tạp để giao tiếp và đọc dữ liệu từ cảm biến, thư viện này cung cấp các câu lệnh đơn giản để thực hiện các tác vụ liên quan đến cảm biến nhiệt độ. Điều này giúp giảm thời gian và công sức lập trình, đồng thời tăng tính linh hoạt và dễ sử dụng trong việc đọc dữ liệu từ cảm biến nhiệt độ.
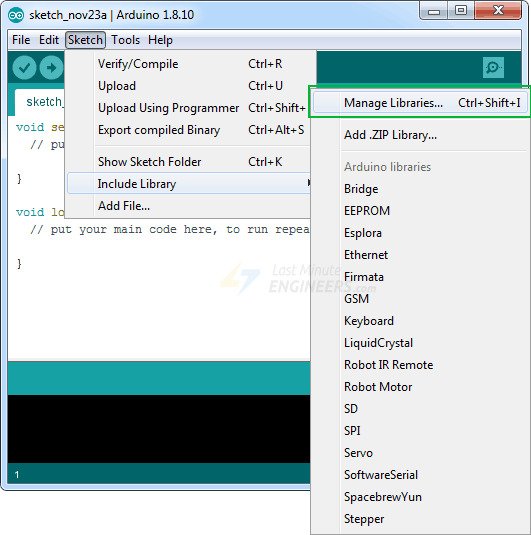
Mở phần mềm Arduino IDE và làm theo các bước sau: Sketch > Include Library > Manage Libraries…
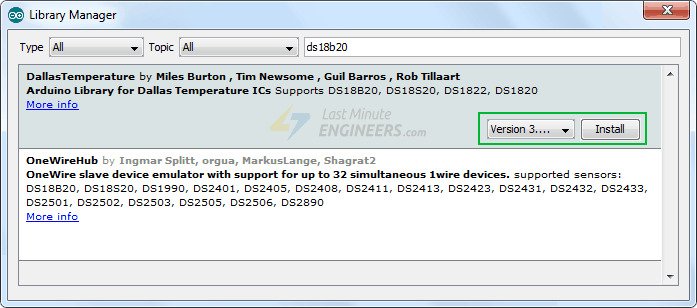
Nhập vào ô tìm kiếm từ khóa ‘ds18b20’. Ở đây sẽ xuất hiện nhiều thư viện khác nhau, các bạn tìm đến DallasTemperature của Miles Burton. Chọn Version mới nhất và tiến hành cài đặt
Vì cảm biến nhiệt độ DS18B20 Arduino truyền nhận dữ liệu thông qua giao tiếp 1 dây. Các bạn nhập vào ô tìm kiếm “onewrite”. Chọn Version mới nhất và tiến hành cài đặt

Phương pháp đọc nhiều cảm biến DS18B20
Có 2 phương pháp được sử dụng để đọc nhiều cảm biến nhiệt độ DS18B20 trên cùng một dây.
- By Index: Phương pháp “getTempCByIndex()” cho phép các bạn đọc nhiệt độ từng cảm biến trên một bus. Các bạn chỉ cần chỉ định chỉ số của cảm biến và sẽ nhận được giá trị nhiệt độ tương ứng.
- By Address: Phương pháp “getTempCByAddress()” cho phép bạn đọc nhiệt độ từ từng cảm biến trên bus bằng cách xác định địa chỉ của cảm biến. Các bạn có thể đọc nhiệt độ từ các cảm biến theo từng địa chỉ riêng biệt và xử lý dữ liệu một cách linh hoạt.
Đọc thêm: Đo nhiệt độ bằng Cảm biến LM35 sử dụng Arduino Uno
Cách 1: Đọc nhiệt độ DS18B20 theo phương pháp “By Index”
Đoạn code bên dưới là một ví dụ về cách sử dụng phương pháp “By Index” để đọc cảm biến nhiệt độ DS18B20 thông qua thư viện OneWire và DallasTemperature trong Arduino
Với đoạn code này, Arduino sẽ liên tục đọc nhiệt độ từ các cảm biến DS18B20, các bạn có thể xác định được từng cảm biến thông qua việc chỉ định số của cảm biến và hiển thị kết quả trên Serial Monitor của Arduino IDE.
#include <OneWire.h>
#include <DallasTemperature.h>

// Data wire is plugged into digital pin 2 on the Arduino
#define ONE_WIRE_BUS 2

// Setup a oneWire instance to communicate with any OneWire device
OneWire oneWire(ONE_WIRE_BUS);

// Pass oneWire reference to DallasTemperature library
DallasTemperature sensors(&oneWire);

int deviceCount = 0;
float tempC;

void setup(void)
{
  sensors.begin();	// Start up the library
  Serial.begin(9600);

  // locate devices on the bus
  Serial.print("Locating devices...");
  Serial.print("Found ");
  deviceCount = sensors.getDeviceCount();
  Serial.print(deviceCount, DEC);
  Serial.println(" devices.");
  Serial.println("");
}

void loop(void)
{
  // Send command to all the sensors for temperature conversion
  sensors.requestTemperatures();

  // Display temperature from each sensor
  for (int i = 0;  i < deviceCount;  i++)
  {
    Serial.print("Sensor ");
    Serial.print(i+1);
    Serial.print(" : ");
    tempC = sensors.getTempCByIndex(i);
    Serial.print(tempC);
    Serial.print((char)176);//shows degrees character
    Serial.print("C  |  ");
    Serial.print(DallasTemperature::toFahrenheit(tempC));
    Serial.print((char)176);//shows degrees character
    Serial.println("F");
  }

  Serial.println("");
  delay(1000);
}
Dưới đây là kết quả nhận được dữ liệu từ ba cảm biến.

Giải thích Code
#include <OneWire.h>
#include <DallasTemperature.h>
Khai báo thư viện OneWire và DallasTemperature.
#define ONE_WIRE_BUS 2
Định nghĩa chân kết nối của bus OneWire trên Arduino (ở đây mình sẽ nối vào chân số 2).
OneWire oneWire(ONE_WIRE_BUS);
Tạo một đối tượng OneWire và truyền chân kết nối (ONE_WIRE_BUS) vào.
DallasTemperature sensors(&oneWire);
Tạo một đối tượng DallasTemperature và truyền đối tượng OneWire vào.
int deviceCount = 0;
float tempC;
Khai báo biến deviceCount để lưu trữ số lượng cảm biến được tìm thấy và biến tempC để lưu trữ giá trị nhiệt độ.
void setup(void)
{
  sensors.begin();    // Start up the library
  Serial.begin(9600);

  // locate devices on the bus
  Serial.print("Locating devices...");
  Serial.print("Found ");
  deviceCount = sensors.getDeviceCount();
  Serial.print(deviceCount, DEC);
  Serial.println(" devices.");
  Serial.println("");
}
Hàm setup() được gọi khi Arduino khởi động. Trong hàm này, thư viện DallasTemperature được khởi tạo và tìm kiếm các cảm biến nhiệt độ có sẵn trên bus OneWire.
void loop(void)
{
  // Send command to all the sensors for temperature conversion
  sensors.requestTemperatures();

  // Display temperature from each sensor
  for (int i = 0;  i < deviceCount;  i++)
  {
    Serial.print("Sensor ");
    Serial.print(i+1);
    Serial.print(" : ");
    tempC = sensors.getTempCByIndex(i);
    Serial.print(tempC);
    Serial.print((char)176);//shows degrees character
    Serial.print("C  |  ");
    Serial.print(DallasTemperature::toFahrenheit(tempC));
    Serial.print((char)176);//shows degrees character
    Serial.println("F");
  }

  Serial.println("");
  delay(1000);
}
Hàm loop() được gọi liên tục sau khi setup() hoàn thành. Trong hàm này, lệnh sensors.requestTemperatures() được gửi đến tất cả các cảm biến để yêu cầu đo nhiệt độ. Sau đó, vòng lặp for được sử dụng để lấy và hiển thị nhiệt độ từ mỗi cảm biến.
Cách 2: Đọc nhiệt độ DS18B20 theo phương pháp “By Address”
Đoạn code bên dưới là một ví dụ sử dụng thư viện DallasTemperature để tìm kiếm và in ra địa chỉ của các cảm biến nhiệt độ DS18B20 được kết nối với Arduino.
Code: Tìm các địa chỉ bus giao tiếp của cảm biến nhiệt độ DS18B20
#include <OneWire.h>
#include <DallasTemperature.h>

// Data wire is plugged into port 2 on the Arduino
#define ONE_WIRE_BUS 2

// Setup a oneWire instance to communicate with any OneWire devices
OneWire oneWire(ONE_WIRE_BUS);

// Pass our oneWire reference to Dallas Temperature.
DallasTemperature sensors(&oneWire);

// variable to hold device addresses
DeviceAddress Thermometer;

int deviceCount = 0;

void setup(void)
{
  // start serial port
  Serial.begin(9600);

  // Start up the library
  sensors.begin();

  // locate devices on the bus
  Serial.println("Locating devices...");
  Serial.print("Found ");
  deviceCount = sensors.getDeviceCount();
  Serial.print(deviceCount, DEC);
  Serial.println(" devices.");
  Serial.println("");

  Serial.println("Printing addresses...");
  for (int i = 0;  i < deviceCount;  i++)
  {
    Serial.print("Sensor ");
    Serial.print(i+1);
    Serial.print(" : ");
    sensors.getAddress(Thermometer, i);
    printAddress(Thermometer);
  }
}

void loop(void)
{}

void printAddress(DeviceAddress deviceAddress)
{
  for (uint8_t i = 0; i < 8; i++)
  {
    Serial.print("0x");
    if (deviceAddress[i] < 0x10) Serial.print("0");
    Serial.print(deviceAddress[i], HEX);
    if (i < 7) Serial.print(", ");
  }
  Serial.println("");
}
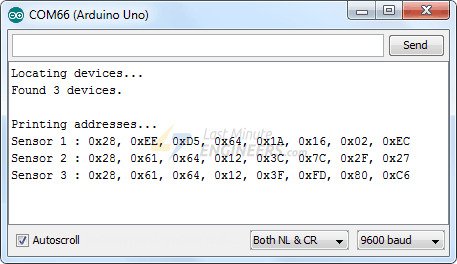
Ở đây các bạn cũng sẽ thấy, mình đã đọc ra ba địa chỉ của cảm biến, lưu lại ba địa chỉ này để thực hiện dự án tiếp theo nhé.
Đọc cảm biến DS18B20 theo địa chỉ
Sau khi đã tìm được địa chỉ bus của ba cảm biến ở trên, các bạn khai báo vào các mảng tương ứng. Đoạn code sử dụng thư viện DallasTemperature để đọc và in ra các giá trị của các cảm biến nhiệt độ DS18B20.
#include <OneWire.h>
#include <DallasTemperature.h>

// Data wire is plugged into port 2 on the Arduino
#define ONE_WIRE_BUS 2

// Setup a oneWire instance to communicate with any OneWire devices
OneWire oneWire(ONE_WIRE_BUS);

// Pass our oneWire reference to Dallas Temperature.
DallasTemperature sensors(&oneWire);

// Addresses of 3 DS18B20s
uint8_t sensor1[8] = { 0x28, 0xEE, 0xD5, 0x64, 0x1A, 0x16, 0x02, 0xEC };
uint8_t sensor2[8] = { 0x28, 0x61, 0x64, 0x12, 0x3C, 0x7C, 0x2F, 0x27 };
uint8_t sensor3[8] = { 0x28, 0x61, 0x64, 0x12, 0x3F, 0xFD, 0x80, 0xC6 };

void setup(void)
{
  Serial.begin(9600);
  sensors.begin();
}

void loop(void)
{
  sensors.requestTemperatures();

  Serial.print("Sensor 1: ");
  printTemperature(sensor1);

  Serial.print("Sensor 2: ");
  printTemperature(sensor2);

  Serial.print("Sensor 3: ");
  printTemperature(sensor3);

  Serial.println();
  delay(1000);
}

void printTemperature(DeviceAddress deviceAddress)
{
  float tempC = sensors.getTempC(deviceAddress);
  Serial.print(tempC);
  Serial.print((char)176);
  Serial.print("C  |  ");
  Serial.print(DallasTemperature::toFahrenheit(tempC));
  Serial.print((char)176);
  Serial.println("F");
}
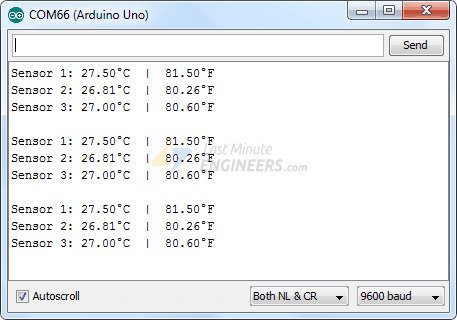
Dữ liệu từ ba cảm biến được in ra Serial Monitor của Arduino IDE.
Giải thích Code
#include <OneWire.h>
#include <DallasTemperature.h>
Khai báo các thư viện cần thiết: OneWire.h và DallasTemperature.h
// Data wire is plugged into port 2 on the Arduino
#define ONE_WIRE_BUS 2
Định nghĩa port kết nối dữ liệu của cảm biến DS18B20 trên Arduino
// Setup a oneWire instance to communicate with any OneWire devices
OneWire oneWire(ONE_WIRE_BUS);
Khởi tạo một đối tượng 1-Wire để giao tiếp với các thiết bị thông qua port đã được định nghĩa
// Pass our oneWire reference to Dallas Temperature.
DallasTemperature sensors(&oneWire);
Truyền một đối tượng oneWire cho thư viện DallasTemperature để tạo ra đối tượng sensors và làm việc với cảm biến nhiệt độ DS18B20 arduino.
// Addresses of 3 DS18B20s
uint8_t sensor1[8] = { 0x28, 0xEE, 0xD5, 0x64, 0x1A, 0x16, 0x02, 0xEC };
uint8_t sensor2[8] = { 0x28, 0x61, 0x64, 0x12, 0x3C, 0x7C, 0x2F, 0x27 };
uint8_t sensor3[8] = { 0x28, 0x61, 0x64, 0x12, 0x3F, 0xFD, 0x80, 0xC6 };
Khai báo các mảng sensor1, sensor2 và sensor3 để lưu trữ địa chỉ của các cảm biến nhiệt độ DS18B20. Địa chỉ này được gán theo định dạng HEX và biểu diễn ở dạng byte.
void printTemperature(DeviceAddress deviceAddress)
{
  float tempC = sensors.getTempC(deviceAddress);
  Serial.print(tempC);
  Serial.print((char)176);
  Serial.print("C  |  ");
  Serial.print(DallasTemperature::toFahrenheit(tempC));
  Serial.print((char)176);
  Serial.println("F");
}
Hàm printTemperature được sử dụng để in ra nhiệt độ từ một cảm biến nhiệt độ. Đầu tiên, nó gọi hàm getTempC để lấy nhiệt độ trong đơn vị Celsius từ cảm biến. Sau đó, nhiệt độ được in ra cổng Serial dưới dạng Celsius (độ C) và Fahrenheit (độ F).