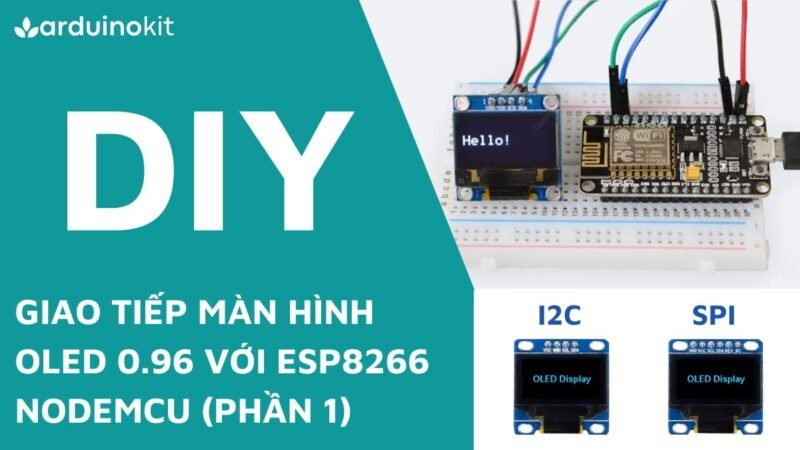
Giao tiếp màn hình OLED 0.96 với ESP8266 NodeMCU (Phần 2)
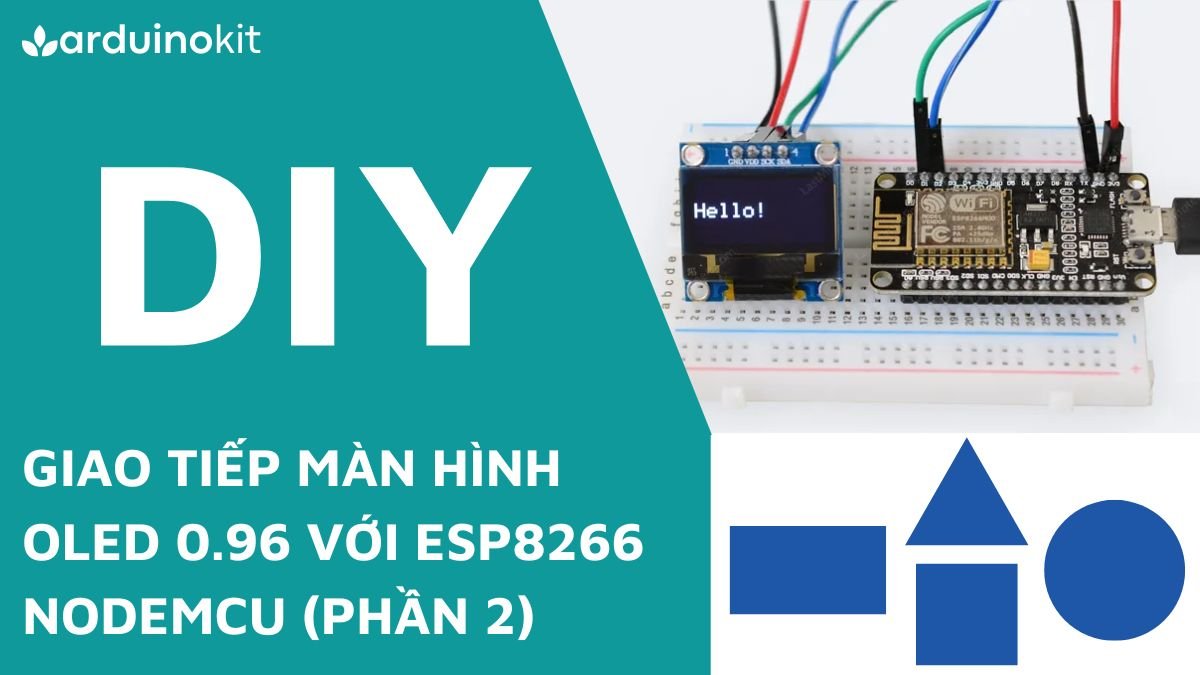
Trong phần 1 của bài viết Giao tiếp màn hình OLED 0.96 với ESP8266 NodeMCU, các bạn đã làm quen với màn hình OLED I2C, qua đó cũng tìm hiểu về cách hiển thị các ký tự lên màn hình, trong phần tiếp theo này, các bạn cùng mình tìm hiểu cách hiển thị các ký tự và vẽ các hình đơn giản lên màn hình. Để hiểu rõ hơn thì các bạn có thể tìm đọc bài viết bên dưới nhé.
Xem phần 1: Giao tiếp màn hình OLED 0.96 với ESP8266 NodeMCU (Phần 1)
Linh kiện cần thiết cho dự án
| TÊN LINH KIỆN | SỐ LƯỢNG | NƠI BÁN |
| ESP8266 NodeMCU | 1 | Shopee | Cytron |
| Màn hình OLED I2C + SPI | 1 | Shopee | Cytron |
| Dây cắm | 10-20 | Shopee | Cytron |
| Breadboard | 1 | Shopee | Cytron |
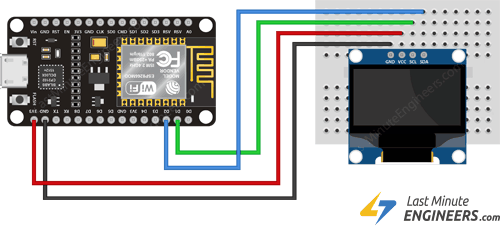
Sơ đồ kết nối màn hình OLED 0.96 I2C với ESP8266 NodeMCU
| ESP8266 NodeMCU | Màn hình OLED SPI |
| 3.3V | VCC |
| GND | GND |
| D2 | SDA |
| D1 | SCL |
Code 1: Hiển thị các ký tự trên màn hình OLED với ESP8266
#include <SPI.h>
#include <Wire.h>
#include <Adafruit_GFX.h>
#include <Adafruit_SSD1306.h>

#define SCREEN_WIDTH 128 // OLED display width, in pixels
#define SCREEN_HEIGHT 64 // OLED display height, in pixels

// Declaration for SSD1306 display connected using I2C
#define OLED_RESET     -1 // Reset pin
#define SCREEN_ADDRESS 0x3C
Adafruit_SSD1306 display(SCREEN_WIDTH, SCREEN_HEIGHT, &Wire, OLED_RESET);

void setup()
{
  Serial.begin(9600);

  // initialize the OLED object
  if(!display.begin(SSD1306_SWITCHCAPVCC, SCREEN_ADDRESS)) {
    Serial.println(F("SSD1306 allocation failed"));
    for(;;); // Don't proceed, loop forever
  }

  // Clear the buffer.
  display.clearDisplay();

  // Display Text
  display.setTextSize(1);
  display.setTextColor(WHITE);
  display.setCursor(0,28);
  display.println("Hello world!");
  display.display();
  delay(2000);
  display.clearDisplay();

  // Display Inverted Text
  display.setTextColor(BLACK, WHITE); // 'inverted' text
  display.setCursor(0,28);
  display.println("Hello world!");
  display.display();
  delay(2000);
  display.clearDisplay();

  // Changing Font Size
  display.setTextColor(WHITE);
  display.setCursor(0,24);
  display.setTextSize(2);
  display.println("Hello!");
  display.display();
  delay(2000);
  display.clearDisplay();

  // Display Numbers
  display.setTextSize(1);
  display.setCursor(0,28);
  display.println(123456789);
  display.display();
  delay(2000);
  display.clearDisplay();

  // Specifying Base For Numbers
  display.setCursor(0,28);
  display.print("0x"); display.print(0xFF, HEX);
  display.print("(HEX) = ");
  display.print(0xFF, DEC);
  display.println("(DEC)");
  display.display();
  delay(2000);
  display.clearDisplay();

  // Display ASCII Characters
  display.setCursor(0,24);
  display.setTextSize(2);
  display.write(3);
  display.display();
  delay(2000);
  display.clearDisplay();

  // Scroll full screen
  display.setCursor(0,0);
  display.setTextSize(1);
  display.println("Full");
  display.println("screen");
  display.println("scrolling!");
  display.display();
  display.startscrollright(0x00, 0x07);
  delay(2000);
  display.stopscroll();
  delay(1000);
  display.startscrollleft(0x00, 0x07);
  delay(2000);
  display.stopscroll();
  delay(1000);
  display.startscrolldiagright(0x00, 0x07);
  delay(2000);
  display.startscrolldiagleft(0x00, 0x07);
  delay(2000);
  display.stopscroll();
  display.clearDisplay();

  // Scroll part of the screen
  display.setCursor(0,0);
  display.setTextSize(1);
  display.println("Scroll");
  display.println("some part");
  display.println("of the screen.");
  display.display();
  display.startscrollright(0x00, 0x00);
}

void loop() {
}
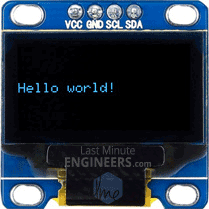
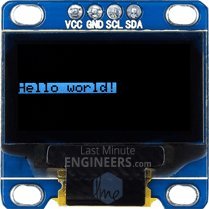
#1 Code hiển thị văn bản đơn giản (Hello world)
// Display Text
display.clearDisplay();
display.setTextSize(1);
display.setTextColor(WHITE);
display.setCursor(0,28);
display.println("Hello world!");
display.display();
delay(2000);
display.clearDisplay(); xóa nội dung hiện tại trên màn hình.
display.setTextSize(1); đặt kích thước chữ cho văn bản là 1, tức là kích thước chữ nhỏ nhất.
display.setTextColor(WHITE); đặt màu chữ là trắng.
display.setCursor(0,28); đặt vị trí con trỏ hiển thị văn bản tại cột 0, dòng 28 trên màn hình.
display.println("Hello world!"); hiển thị chuỗi văn bản “Hello world!” trên màn hình.
display.display(); cập nhật hiển thị văn bản lên màn hình.
delay(2000); dừng chương trình trong 2 giây để văn bản có thời gian hiển thị trên màn hình.
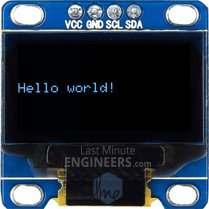
#2 Code hiển thị văn bản ngược (Displaying Inverted Text)
// Display Inverted Text
display.clearDisplay();
display.setTextColor(BLACK, WHITE); // 'inverted' text
display.setCursor(0,28);
display.println("Hello world!");
display.display();
delay(2000);
display.setTextColor(BLACK, WHITE); đặt màu chữ là đen và nền là trắng, tạo hiệu ứng văn bản nghịch đảo.
#3 Code thay đổi kích thước chữ (Scaling Font Size)
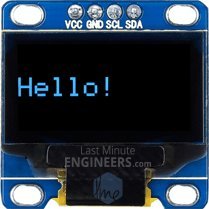
// Changing Font Size
display.clearDisplay();
display.setTextColor(WHITE);
display.setCursor(0,24);
display.setTextSize(2);
display.println("Hello!");
display.display();
delay(2000);
display.setTextSize(2); thay đổi kích thước chữ thành 2, làm cho chữ được hiển thị lớn hơn.
Các ký tự được hiển thị theo tỷ lệ 7:10. Nói cách khác, cỡ chữ 1 sẽ hiển thị văn bản ở 7×10 pixel, cỡ chữ 2 sẽ hiển thị văn bản ở 14×20 pixel mỗi ký tự.
#4 Code hiển thị số (Displaying Numbers)
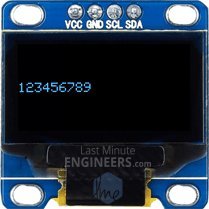
// Display Numbers
display.clearDisplay();
display.setTextSize(1);
display.setCursor(0,28);
display.println(123456789);
display.display();
delay(2000);
Để hiển thị một số nguyên trên màn hình OLED, ta có thể sử dụng hàm println(). Trước đó, ta sử dụng hàm setTextSize(1) để đặt kích thước font chữ là 1.
Khi gọi println() với một số nguyên, thư viện sẽ tự động chuyển đổi số nguyên đó thành chuỗi ký tự và hiển thị nó trên màn hình. Trong trường hợp này, số nguyên 123456789 sẽ được chuyển đổi thành chuỗi ký tự và hiển thị lên màn hình OLED.
#5 Code hiển thị xác định cơ số (Specifying Base For Numbers)
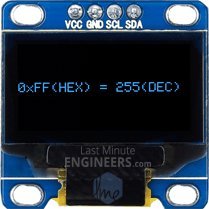
// Specifying Base For Numbers
display.clearDisplay();
display.setCursor(0,28);
display.print("0x"); display.print(0xFF, HEX);
display.print("(HEX) = ");
display.print(0xFF, DEC);
display.println("(DEC)");
display.display();
delay(2000);
Để xác định cơ số cho các số được hiển thị trên màn hình OLED, ta có thể sử dụng hàm print().
Trong đoạn code trên, ta sử dụng hàm print() để hiển thị số 0xFF (255) ở hai cơ số khác nhau. Đầu tiên, ta sử dụng print(0xFF, HEX) để hiển thị số 0xFF dưới dạng cơ số 16 (hexadecimal), kèm theo tiền tố “0x”. Tiếp theo, ta sử dụng print(0xFF, DEC) để hiển thị số 0xFF dưới dạng cơ số 10 (decimal). Cuối cùng, ta sử dụng println() để xuống dòng và hiển thị “DEC” để chỉ ra rằng đây là cơ số 10.
Kết quả sẽ là: “0xFF (HEX) = 255 (DEC)” sẽ được hiển thị trên màn hình OLED.
#6 Code hiển thị ký tự ASCII (Displaying ASCII Symbols)
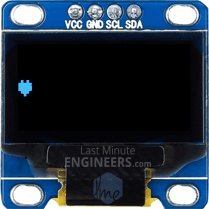
// Display ASCII Characters
display.clearDisplay();
display.setCursor(0,24);
display.setTextSize(2);
display.write(3);
display.display();
delay(2000);
Đoạn code trên được sử dụng để hiển thị ký tự ASCII trên màn hình OLED. Trong đó, hàm write() được sử dụng để ghi ký tự ASCII lên màn hình.
Trong trường hợp này, ký tự ASCII có mã số 3 được hiển thị. Ký tự ASCII có mã số 3 thường được biểu thị bởi một ký hiệu đặc biệt, thường được gọi là ký tự End of Text (EOT).
Khi đoạn code được thực thi, ký tự ASCII có mã số 3 sẽ được hiển thị trên màn hình OLED với kích thước chữ là 2.
#7 Code cuộn toàn bộ màn hình (Full Screen Scrolling)
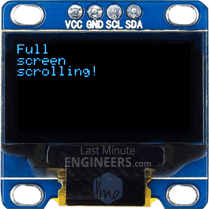
// Scroll full screen
display.clearDisplay();
display.setCursor(0,0);
display.setTextSize(1);
display.println("Full");
display.println("screen");
display.println("scrolling!");
display.display();
display.startscrollright(0x00, 0x07);
delay(2000);
display.stopscroll();
delay(1000);
display.startscrollleft(0x00, 0x07);
delay(2000);
display.stopscroll();
delay(1000);
display.startscrolldiagright(0x00, 0x07);
delay(2000);
display.startscrolldiagleft(0x00, 0x07);
delay(2000);
display.stopscroll();
Các hàm cuộn màn hình startscrollright(), startscrollleft(), startscrolldiagright(), startscrolldiagleft() được sử dụng để bắt đầu cuộn màn hình với các tham số tương ứng, và stopscroll() được sử dụng để dừng cuộn màn hình.
#8 Code cuộn cụ thể từng phần (Scrolling Specific Part)
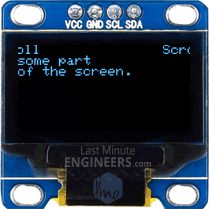
// Scroll part of the screen
display.setCursor(0,0);
display.setTextSize(1);
display.println("Scroll");
display.println("some part");
display.println("of the screen.");
display.display();
display.startscrollright(0x00, 0x00);
Hàm display.startscrollright(0x00, 0x00) dùng để bắt đầu cuộn một phần của màn hình sang bên phải. Tham số đầu tiên là bắt đầu cuộn và tham số thứ hai là kết thúc cuộn.
Code 2: Vẽ hình đơn giản trên màn hình OLED 0.96 với ESP8266 NodeMCU
#include <SPI.h>
#include <Wire.h>
#include <Adafruit_GFX.h>
#include <Adafruit_SSD1306.h>

#define SCREEN_WIDTH 128 // OLED display width, in pixels
#define SCREEN_HEIGHT 64 // OLED display height, in pixels

// Declaration for SSD1306 display connected using I2C
#define OLED_RESET     -1 // Reset pin
#define SCREEN_ADDRESS 0x3C
Adafruit_SSD1306 display(SCREEN_WIDTH, SCREEN_HEIGHT, &Wire, OLED_RESET);

void setup()
{
  Serial.begin(9600);

  // initialize the OLED object
  if(!display.begin(SSD1306_SWITCHCAPVCC, SCREEN_ADDRESS)) {
    Serial.println(F("SSD1306 allocation failed"));
    for(;;); // Don't proceed, loop forever
  }

  // Clear the buffer.
  display.clearDisplay();

  // Draw Rectangle
  display.setTextSize(1);
  display.setTextColor(WHITE);
  display.setCursor(0,0);
  display.println("Rectangle");
  display.drawRect(0, 15, 60, 40, WHITE);
  display.display();
  delay(2000);
  display.clearDisplay();

  // Draw Filled Rectangle
  display.setTextSize(1);
  display.setTextColor(WHITE);
  display.setCursor(0,0);
  display.println("Filled Rectangle");
  display.fillRect(0, 15, 60, 40, WHITE);
  display.display();
  delay(2000);
  display.clearDisplay();

  // Draw Round Rectangle
  display.setTextSize(1);
  display.setTextColor(WHITE);
  display.setCursor(0,0);
  display.println("Round Rectangle");
  display.drawRoundRect(0, 15, 60, 40, 8, WHITE);
  display.display();
  delay(2000);
  display.clearDisplay();

  // Draw Filled Round Rectangle
  display.setTextSize(1);
  display.setTextColor(WHITE);
  display.setCursor(0,0);
  display.println("Filled Round Rectangl");
  display.fillRoundRect(0, 15, 60, 40, 8, WHITE);
  display.display();
  delay(2000);
  display.clearDisplay();

  // Draw Circle
  display.setTextSize(1);
  display.setTextColor(WHITE);
  display.setCursor(0,0);
  display.println("Circle");
  display.drawCircle(20, 35, 20, WHITE);
  display.display();
  delay(2000);
  display.clearDisplay();

  // Draw Filled Circle
  display.setTextSize(1);
  display.setTextColor(WHITE);
  display.setCursor(0,0);
  display.println("Filled Circle");
  display.fillCircle(20, 35, 20, WHITE);
  display.display();
  delay(2000);
  display.clearDisplay();

  // Draw Triangle
  display.setTextSize(1);
  display.setTextColor(WHITE);
  display.setCursor(0,0);
  display.println("Triangle");
  display.drawTriangle(30, 15, 0, 60, 60, 60, WHITE);
  display.display();
  delay(2000);
  display.clearDisplay();

  // Draw Filled Triangle
  display.setTextSize(1);
  display.setTextColor(WHITE);
  display.setCursor(0,0);
  display.println("Filled Triangle");
  display.fillTriangle(30, 15, 0, 60, 60, 60, WHITE);
  display.display();
  delay(2000);
  display.clearDisplay();
}

void loop() {
}
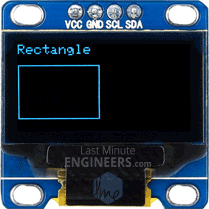
#1 Code vẽ hình chữ nhật
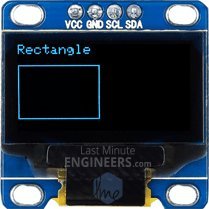

display.clearDisplay();
display.setTextSize(1);
display.setTextColor(WHITE);
display.setCursor(0,0);
display.println("Rectangle");
display.drawRect(0, 15, 60, 40, WHITE);
display.display();
delay(2000);

display.clearDisplay();
display.setTextSize(1);
display.setTextColor(WHITE);
display.setCursor(0,0);
display.println("Filled Rectangle");
display.fillRect(0, 15, 60, 40, WHITE);
display.display();
delay(2000);
Để vẽ một hình chữ nhật không tô màu, sử dụng hàm display.drawRect(x, y, width, height, color). Trong đoạn code trên, ta vẽ một hình chữ nhật tại vị trí (0, 15) với chiều rộng 60 và chiều cao 40, có màu trắng. Vị trí (x, y) là góc trái trên của hình chữ nhật, và color là màu sắc của hình chữ nhật.
Để vẽ một hình chữ nhật được tô màu, sử dụng hàm display.fillRect(x, y, width, height, color). Trong đoạn code trên, ta vẽ một hình chữ nhật được tô màu (filled rectangle) tại vị trí (0, 15) với chiều rộng 60 và chiều cao 40, có màu trắng.
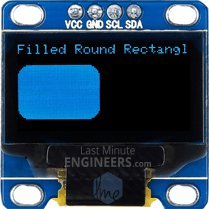
#2 Code vẽ hình chữ nhật tròn
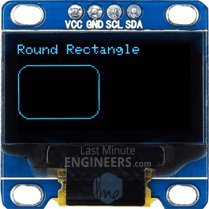
display.clearDisplay();
display.setTextSize(1);
display.setTextColor(WHITE);
display.setCursor(0,0);
display.println("Round Rectangle");
display.drawRoundRect(0, 15, 60, 40, 8, WHITE);
display.display();
delay(2000);

display.clearDisplay();
display.setTextSize(1);
display.setTextColor(WHITE);
display.setCursor(0,0);
display.println("Filled Round Rectangl");
display.fillRoundRect(0, 15, 60, 40, 8, WHITE);
display.display();
delay(2000);
Để vẽ một hình chữ nhật bo tròn không tô màu, sử dụng hàm display.drawRoundRect(x, y, width, height, radius, color). Trong đoạn code trên, ta vẽ một hình chữ nhật bo tròn tại vị trí (0, 15) với chiều rộng 60, chiều cao 40 và bán kính cong 8, có màu trắng. Vị trí (x, y) là góc trái trên của hình chữ nhật, radius là bán kính cong của hình chữ nhật, và color là màu sắc của hình chữ nhật.
Để vẽ một hình chữ nhật bo tròn được tô màu, sử dụng hàm display.fillRoundRect(x, y, width, height, radius, color). Kích thước, màu sắc, bán kính tương tự như ở trên.
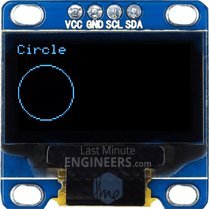
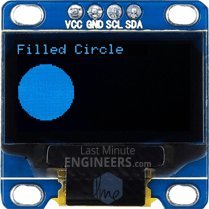
#3 Code vẽ vòng tròn
display.clearDisplay();
display.setTextSize(1);
display.setTextColor(WHITE);
display.setCursor(0,0);
display.println("Circle");
display.drawCircle(20, 35, 20, WHITE);
display.display();
delay(2000);

display.clearDisplay();
display.setTextSize(1);
display.setTextColor(WHITE);
display.setCursor(0,0);
display.println("Filled Circle");
display.fillCircle(20, 35, 20, WHITE);
display.display();
delay(2000);
Để vẽ một hình tròn không được tô màu, sử dụng hàm display.drawCircle(x, y, radius, color). Trong đoạn code trên, ta vẽ một hình tròn tại vị trí (20, 35) với bán kính 20, có màu trắng. Vị trí (x, y) là tâm của hình tròn, radius là bán kính của hình tròn, và color là màu sắc của hình tròn.
Để vẽ một hình tròn được tô màu, sử dụng hàm display.fillCircle(x, y, radius, color). Trong đoạn code trên, ta vẽ một hình tròn được tô màu (filled circle) tại vị trí (20, 35) với bán kính 20, có màu trắng.
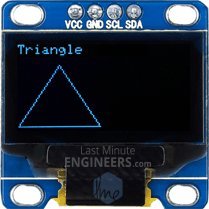
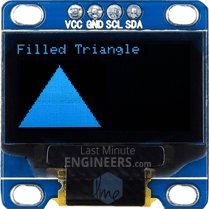
#4 Code vẽ hình tam giác
display.clearDisplay();
display.setTextSize(1);
display.setTextColor(WHITE);
display.setCursor(0,0);
display.println("Triangle");
display.drawTriangle(30, 15, 0, 60, 60, 60, WHITE);
display.display();
delay(2000);

display.clearDisplay();
display.setTextSize(1);
display.setTextColor(WHITE);
display.setCursor(0,0);
display.println("Filled Triangle");
display.fillTriangle(30, 15, 0, 60, 60, 60, WHITE);
display.display();
delay(2000);
Để vẽ một hình tam giác không tô màu, sử dụng hàm display.drawTriangle(x0, y0, x1, y1, x2, y2, color). Trong đoạn code trên, ta vẽ một hình tam giác có các đỉnh (30, 15), (0, 60), (60, 60) và có màu trắng. Các đỉnh của tam giác được xác định bởi các cặp tọa độ (x, y), và color là màu sắc của tam giác.
Để vẽ một hình tam giác được tô màu, sử dụng hàm display.fillTriangle(x0, y0, x1, y1, x2, y2, color). Các thông số của các đỉnh giống như ở trên.