
Cảm biến độ ẩm | Hệ thống tưới tự động sử dụng Arduino

Nội dung bài viết hôm nay mình sẽ hướng dẫn cho các bạn một dự án giám sát độ ẩm trong nông nghiệp, phù hợp cho những vườn rau nhỏ.
Để đảm bảo độ ẩm trong đất đạt mức tốt nhất. Trong dự án này ngoài việc đọc độ ẩm và được hiển thị lên LCD16X2, còn có thể điều chỉnh độ ẩm ở mức phù hợp.
Khi độ ẩm nhỏ hơn mức độ ẩm được cài đặt thì sẽ cho bơm hoạt động cung cấp nước để đổ ẩm đạt mức tốt nhất.
Xem ngay: Hướng dẫn sử dụng cảm biến độ ẩm điện dung với Arduino
Sơ đồ đấu nối
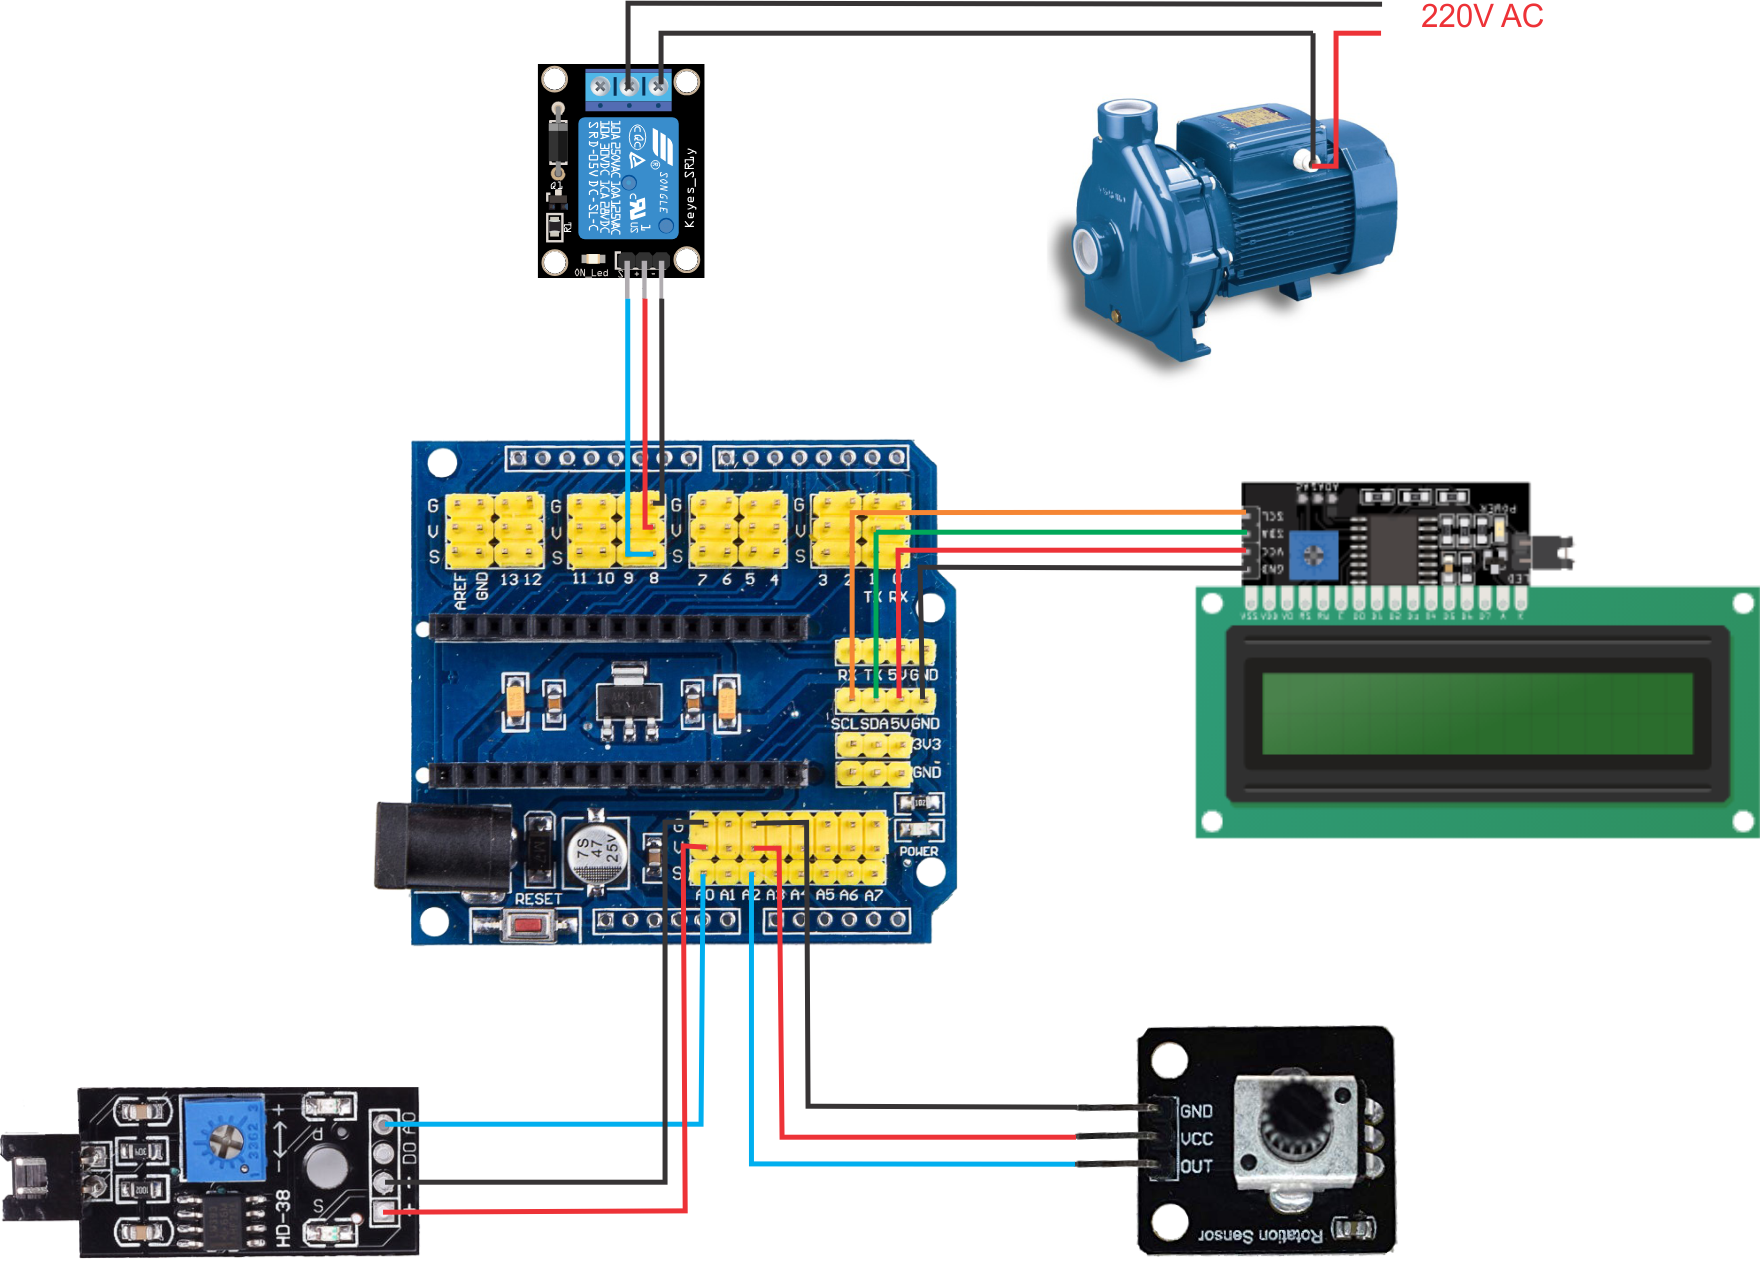
Các linh kiện cần thiết cho dự án
| Tên linh kiện | Số lượng | Shopee |
| Arduino Uno R3 | 1 | Mua ngay |
| Cáp nạp | 1 | Mua ngay |
| Dây cắm (Đực – Cái) | 3 | Mua ngay |
| Relay 5V/1 kênh | 1 | Mua ngay |
| LCD16X2 | 1 | Mua ngay |
| Board I2C LCD16X2 | 1 | Mua ngay |
| Cảm biến độ ẩm Analog | 1 | Mua ngay |
| Nguồn Adapter 12V/2A | 1 | Mua ngay |
| Biến trở 100k | 1 | Mua ngay |
| Breadboard | 1 | Mua ngay |
Code
#include <Wire.h>
#include <LiquidCrystal_I2C.h>
LiquidCrystal_I2C lcd(0x27,16,2);
#define doam A0
#define pot A2
#define relay 8

int doamdat;
int bientro;
bool trangthai;
bool first = true;
unsigned long timeBom;

void hienthi(int DoAm, int Nguong){
  /////////// Do am //////////
  lcd.setCursor(10,0);
  lcd.print(DoAm);
  if(DoAm <=9)
  {
    lcd.print("  %");
  }
  else if(DoAm <=99)
  {
    lcd.print(" %");
  }
  else{
   lcd.print("%");
  }
  ////////// Bien tro //////////////
  lcd.setCursor(10,1);
  lcd.print(Nguong);
   if(Nguong <=9)
  {
    lcd.print("  %");
  }
  else if(Nguong <=99)
  {
    lcd.print(" %");
  }
  else{
   lcd.print("%");
  }
}

void setup() {
  Serial.begin(9600);//Mở cổng Serial ở mức 9600
  pinMode(relay,OUTPUT);
  lcd.init();
  lcd.backlight();
  lcd.setCursor(1,0);
  lcd.print(" Do am: ");
  lcd.setCursor(0,1);
  lcd.print(" Bientro: ");
  digitalWrite(relay, HIGH);
  Serial.println("Tuoi cay tu dong");
}

void loop() {

  doamdat = analogRead(doam);
  doamdat = map(doamdat, 1023,0,0,100);
  bientro = analogRead(pot);
  bientro = map(bientro, 0,1023,0,100);
  hienthi(doamdat,bientro);
  delay(1000);

  if(doamdat < bientro){
    if(first){
      Serial.println("Bat bom");
      digitalWrite(relay,LOW);
      trangthai = true;
      timeBom = millis();
      Serial.println(String("Time bat: ") + timeBom);
      first = false;
    }
  }
  if(((millis() - timeBom) > 10000) && trangthai == true){
    Serial.println("Tat bom");
    Serial.println(String("Time tat: ") + millis());
    digitalWrite(relay, HIGH);
    trangthai = false;
    first = true;
  }

}
Thư viện
Lời kết
| Tham gia cộng đồng Arduino KIT Để nhận được nhiều kiến thức bổ ích, các bạn Đăng ký để nhận thông báo khi có bài viết mới nhé. Tham gia Cộng đồng Arduino KIT để cùng nhau thảo luận và chia sẽ kiến thức về lập trình Arduino. Nếu các bạn thấy bài viết bổ ích nhớ Like và Share cho mọi người cùng học nhé. |
Bài viết liên quan
- Tổng quan LCD 16×2 và giao tiếp I2C LCD sử dụng Arduino
- Hiển thị nhiệt độ, độ ẩm lên LCD 16×2 giao tiếp bằng I2C sử dụng Arduino
- Sử dụng cảm biến độ ẩm đất (Soil Moisture Sensor) với Arduino
- Giao tiếp nhiều cảm biến nhiệt độ DS18B20 với Arduino


anh ơi, anh có thể giúp em giải đáp cái này đc ko ạ. Làm sao để số hiển thị lên LCD khi đếm ko bị nhảy sai vị trí ạ. Ví dụ: khi đếm số ở hàng đơn vị nhảy lên hàng chục, 1 -> 2 thành 11 -> 21. Và cả lỗi hiển thị T:0 thành 0:
#include <Wire.h>
#include <LiquidCrystal_I2C.h>
#include <Servo.h>
LiquidCrystal_I2C lcd(0x27, 16,2);
#define S0 2
#define S1 3
#define S2 4
#define S3 5
#define Out1 6
#define S00 8
#define S11 9
#define S22 10
#define S33 11
#define Out2 12
//—–Khai bao bien tren lcd
int TONG=0;
int spR=0;
int spG=0;
int spB=0;
//—–Khai bao bien doc tan so 3 mau
int red = 0;
int green = 0;
int blue = 0;
int r = 0;
int g = 0;
int b = 0;
int r_1 = 0;
int g_1 = 0;
int b_1 = 0;
int colors[6][6];
void initColor()
{
colors[0][0] = 35;//Min R 14
colors[0][1] = 100;//Max R 18
colors[0][2] = 100;//Min G 17
colors[0][3] = 271;//Max G 23
colors[0][4] = 72;//Min B 27
colors[0][5] = 184;//Max B 32
//—————————
colors[1][0] = 29;//R
colors[1][1] = 79;
colors[1][2] = 39;///G
colors[1][3] = 108;
colors[1][4] = 54;//B
colors[1][5] = 136;
//—————————
colors[2][0] = 82;//R
colors[2][1] = 303;
colors[2][2] = 52;///G
colors[2][3] = 194;
colors[2][4] = 54;//B
colors[2][5] = 194;
colors[3][0] = 34;//Min R 14
colors[3][1] = 103;//Max R 18
colors[3][2] = 104;//Min G 17
colors[3][3] = 263;//Max G 23
colors[3][4] = 80;//Min B 27
colors[3][5] = 190;//Max B 32
//—————————
colors[4][0] = 27;//R
colors[4][1] = 91;
colors[4][2] = 37;///G
colors[4][3] = 124;
colors[4][4] = 55;//B
colors[4][5] = 163;
//—————————
colors[5][0] = 87;//R
colors[5][1] = 250;
colors[5][2] = 56;///G
colors[5][3] = 180;
colors[5][4] = 63;//B
colors[5][5] = 171;
}
void deleterow1()
{
lcd.setCursor(0,0);
lcd.print(” “);
}
void deleterow2()
{
lcd.setCursor(1,0);
lcd.print(” “);
}
void setup() {
// Setting the outputs
pinMode(S0, OUTPUT);
pinMode(S1, OUTPUT);
pinMode(S2, OUTPUT);
pinMode(S3, OUTPUT);
pinMode(S00, OUTPUT);
pinMode(S11, OUTPUT);
pinMode(S22, OUTPUT);
pinMode(S33, OUTPUT);
// Setting the sensorOut as an input
pinMode(Out1, INPUT);
pinMode(Out2, INPUT);
// Setting frequency scaling to 20%
digitalWrite(S0,HIGH);
digitalWrite(S1,LOW);
digitalWrite(S00,HIGH);
digitalWrite(S11,LOW);
lcd.begin(16,2); lcd.backlight();
lcd.print(“HE THONG DEM VA”);
lcd.setCursor(0,1);
lcd.print(“PHAN LOAI S.PHAM”);
delay(1000);
lcd.clear(); lcd.home();
lcd.print(“PROCESSING.”);delay(700);
lcd.home();
lcd.clear();
lcd.setCursor(7,0); lcd.print(“T:”);
lcd.setCursor(3,1);
lcd.print(spR);
lcd.setCursor(8,1);
lcd.print(spG);
lcd.setCursor(13,1);
lcd.print(spB);
lcd.setCursor(0,1);
lcd.print(” R: G: B:”);
initColor();
// Begins serial communication
Serial.begin(9600);
}
int readColor()
{
digitalWrite(S2,LOW);
digitalWrite(S3,LOW);
digitalWrite(S22,LOW);
digitalWrite(S33,LOW);
r = pulseIn(Out1, LOW);
r_1 = pulseIn(Out2, LOW);
delay(50);
digitalWrite(S2,HIGH);
digitalWrite(S3,HIGH);
digitalWrite(S22,HIGH);
digitalWrite(S33,HIGH);
g = pulseIn(Out1, LOW);
g_1 = pulseIn(Out2, LOW);
delay(50);
digitalWrite(S2,LOW);
digitalWrite(S3,HIGH);
digitalWrite(S22,LOW);
digitalWrite(S33,HIGH);
b = pulseIn(Out1, LOW);
b_1 = pulseIn(Out2, LOW);
delay(50);
//Serial.println(“R = “+(String)r + ” G = “+(String)g + ” B = “+(String)b);
for(int i =0; i < 3; i++){
if(r >= colors[i][0] && r <= colors[i][1] &&
g >= colors[i][2] && g <= colors[i][3] &&
b >= colors[i][4] && b <= colors[i][5])
{
return i;
}
}
for(int i =3; i < 6; i++){
if(r_1 >= colors[i][0] && r_1 <= colors[i][1] &&
g_1 >= colors[i][2] && g_1 <= colors[i][3] &&
b_1 >= colors[i][4] && b_1 <= colors[i][5])
{
return i;
}
}
return -1;
}
void loop() {
int c = readColor();
if(c==0)
{
spR=spR+1;
lcd.setCursor(3,1);
lcd.print(spR);
}
if(c==1)
{
spG=spG+1;
lcd.setCursor(8,1);
lcd.print(spG);
}
if(c==2)
{
spB=spB+1;
lcd.setCursor(13,1);
lcd.print(spB);
}
if(c==3)
{
spR=spR-1;
lcd.setCursor(3,1);
lcd.print(spR);
}
if(c==4)
{
spG=spG-1;
lcd.setCursor(8,1);
lcd.print(spG);
}
if(c==5)
{
spB=spB-1;
lcd.setCursor(13,1);
lcd.print(spB);
}
TONG=spR+spG+spB;
lcd.setCursor(7,0);
lcd.print(TONG);
delay(1000);
}
void set_up()
{
Serial.print(“R: “);
Serial.print(spR, DEC);
Serial.print(“G: “);
Serial.print(spG, DEC);
Serial.print(“B: “);
Serial.print(spB, DEC);
Serial.print(“T: “);
Serial.print(TONG, DEC);
}
Anh cho em hỏi có bắt buộc phải dùng biến trở 100k không ạ? Em sứ dụng con biến trở 5k thì thấy nó vẫn làm việc bình thường