
RFID là gì? Hướng dẫn sử dụng Module RFID RC522 với Arduino
Module RFID RC522 Arduino không còn quá xa lạ với các bạn, nó được ứng dụng rất nhiều trong các ứng dụng như mở khoá cửa tự động, các giải pháp thanh toán,…và rất rất nhiều ứng dụng khác. Đây là một bài viết sẽ giúp bạn hiểu rõ hơn về RFID và nguyên lý hoạt động của chúng. Qua đó mình sẽ giới thiệu cách ứng dụng RFID RC522 vào một dự án hệ thống khóa cửa thông minh.
Để tạo động lực cho Team Arduino KIT ra nhiều bài viết chất lượng hơn, các bạn có thể ủng hộ mình bằng cách Donate qua MoMo, Ngân hàng, Paypal…Nhấn vào link bên dưới nhé.
RFID là gì? Nguyên lý hoạt động của Module RFID RC522
RFID là viết tắt của “Radio Frequency Identification”, có nghĩa là nhận dạng bằng tần số radio. Đây là một công nghệ sử dụng sóng radio để truyền và nhận dạng thông tin từ một thẻ hoặc một thiết bị RFID. Hệ thống RFID bao gồm ít nhất hai thành phần chính: một thẻ RFID (hay còn gọi là tag RFID) và một đầu đọc RFID (hay còn gọi là reader RFID).
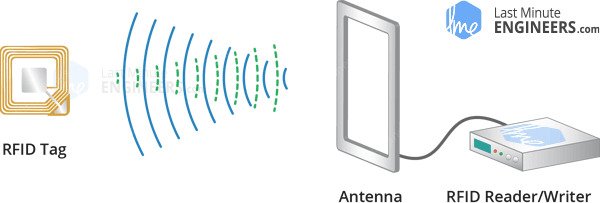
Thẻ RFID thường được gắn vật lên vật thể, nó chứa một anten để thu phát sóng radio và một chip chứa thông tin cần được nhận dạng. Đầu đọc RFID sử dụng sóng radio để truyền đi và nhận lại thông tin từ thẻ RFID. Khi thẻ RFID được đặt trong phạm vi hoạt động của đầu đọc RFID, thông tin từ thẻ sẽ được truyền đến đầu đọc RFID để xử lý và xác định thông tin nhận dạng.
Tổng quan về phần cứng
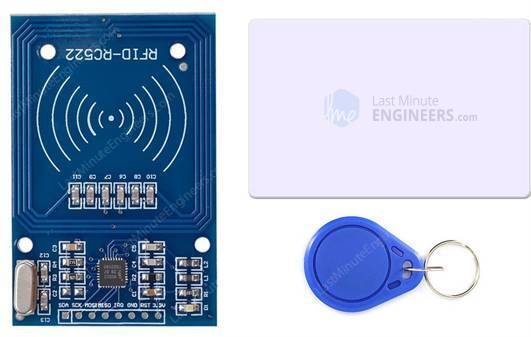
Module RFID RC522 là một module sử dụng công nghệ RFID để đọc và ghi thông tin từ các thẻ RFID. Nó được sử dụng phổ biến trong các dự án Arduino và các ứng dụng liên quan đến nhận dạng và theo dõi.
Module RFID Arduino bao gồm một chip đọc RFID MFRC522 và các thành phần khác như anten và các linh kiện điện tử. Chip MFRC522 có khả năng đọc và ghi dữ liệu từ các thẻ RFID tiêu chuẩn, bao gồm các loại thẻ MIFARE và các loại thẻ tương thích.
Module RFID RC522 kết nối với Arduino thông qua giao tiếp SPI (Serial Peripheral Interface) hoặc I2C và UART.
Để sử dụng module RFID RC522, cần có thư viện hỗ trợ cho Arduino như thư viện MFRC522, giúp dễ dàng giao tiếp và điều khiển module. Thông qua thư viện này, bạn có thể đọc thông tin từ thẻ RFID, xác minh chúng và thực hiện các hoạt động như đọc mã số, ghi dữ liệu, kiểm tra trạng thái và điều khiển anten.
Thông số kỹ thuật
| Frequency Range | 13.56 MHz ISM Band |
| Host Interface | SPI / I2C / UART |
| Operating Supply Voltage | 2.5 V to 3.3 V |
| Max. Operating Current | 13-26mA |
| Min. Current(Power down) | 10µA |
| Logic Inputs | 5V Tolerant |
| Read Range | 5 cm |
Sơ đồ chân Module RFID RC522
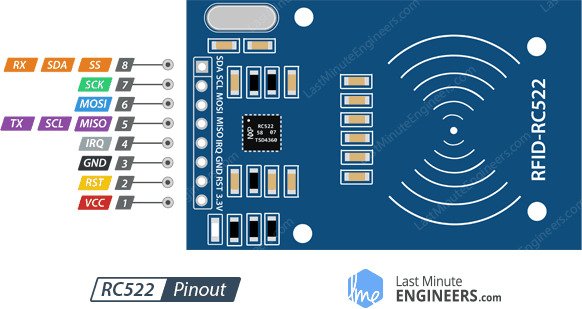
- SDA (Serial Data): Dùng để truyền và nhận dữ liệu giữa module RFID RC522 Arduino.
- SCK (Serial Clock): Dùng để đồng bộ hóa truyền thông SPI giữa module RFID RC522 và Arduino.
- MOSI (Master Output Slave Input): Dùng để truyền dữ liệu từ Arduino tới module RFID RC522.
- MISO (Master Input Slave Output): Chân đầu vào của Arduino nối với chân MISO trên module RFID RC522. Dùng để nhận dữ liệu từ module RFID RC522 về Arduino qua giao thức SPI.
- IRQ (Interrupt Request): Chân ngắt không được sử dụng trong một số ứng dụng của module RFID RC522. Nếu sử dụng, chân này được sử dụng để xác định xem module RFID RC522 có sự kiện cần xử lý hay không.
- GND (Ground): Chân đất kết nối với chân GND trên Arduino.
- RST (Reset): Chân đặt lại (reset) module RFID RC522. Khi chân này được kích hoạt, module sẽ được đặt lại về trạng thái ban đầu.
- 3.3V: Nguồn cấp 3.3V cho module.
Các linh kiện cần thiết cho dự án
| TÊN LINH KIỆN | SỐ LƯỢNG | NƠI BÁN |
| Arduino Uno R3 | 1 | Shopee | Cytron |
| RFID RC522 | 1 | Shopee | Cytron |
| Dây cắm (Đực – Cái) | 10 – 20 | Shopee | Cytron |
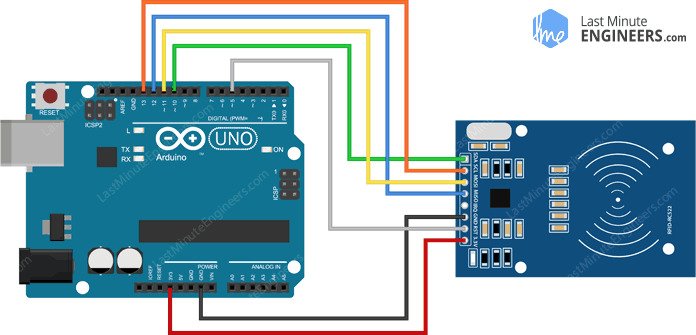
Sơ đồ đấu nối Module RFID RC522 với Arduino Uno
| RC522 Module | Arduino |
| VCC | 3.3V |
| GND | GND |
| RST | 5 |
| MISO / SCL / Tx | 12 |
| MOSI | 11 |
| SCK | 13 |
| SS / SDA / Rx | 10 |
Cài đặt thư viện MFRC522
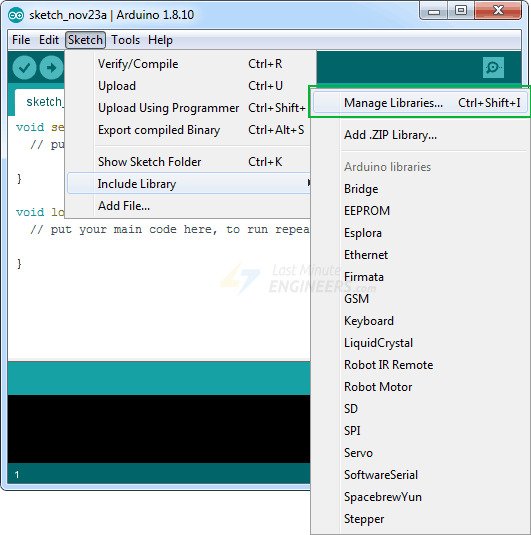
Mở Arduino IDE trên máy tính của bạn. Trong menu chính của Arduino IDE, chọn “Sketch” -> “Include Library” -> “Manage Libraries…”.
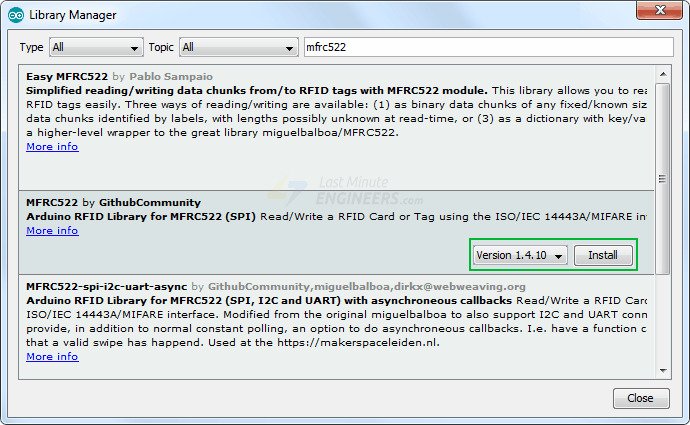
Một cửa sổ “Library Manager” sẽ hiển thị. Trong ô tìm kiếm, gõ “MFRC522” và nhấn Enter.
Thư viện “MFRC522” sẽ xuất hiện trong kết quả tìm kiếm. Nhấn vào nút “Install” bên cạnh thư viện để tiến hành cài đặt.
Code: Đọc thẻ RFID
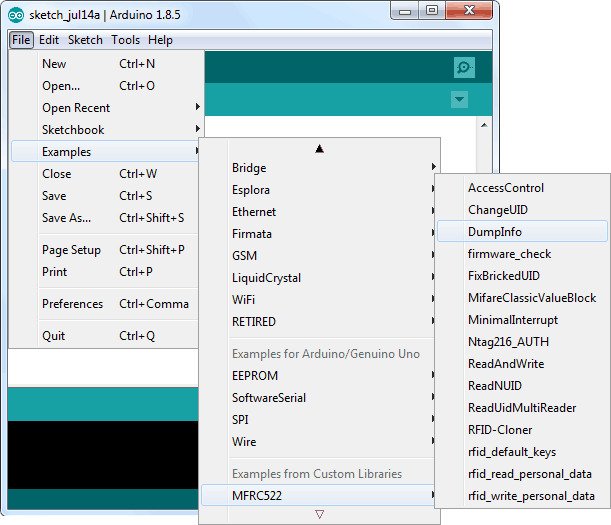
Sau khi bạn đã cài đặt thư viện thành công, vào phần Ví dụ và chọn MFRC522 > DumpInfo.
Đoạn code này dùng để đọc và hiển thị thông tin thẻ RFID lên cổng Serial.
Định nghĩa chân kết nối RST_PIN là chân số 5 trên Arduino.
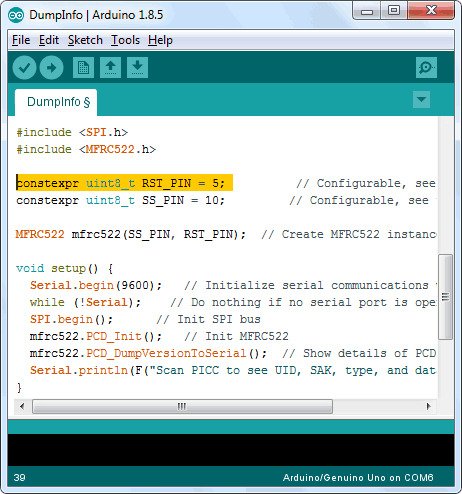
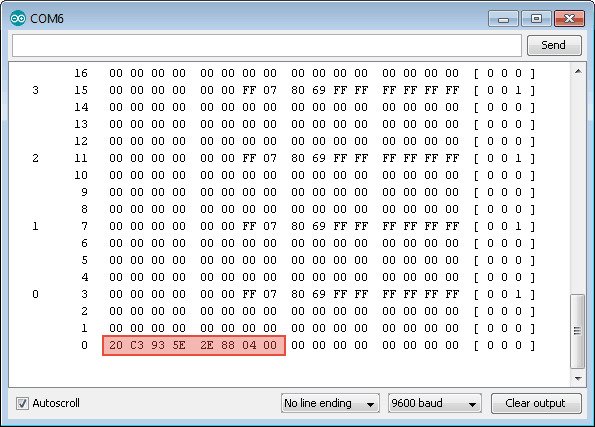
Tiếp hành nạp Code vào Arduino Uno, đưa thẻ đến module RFID Arduino, bạn sẽ nhận được giá trị như sau. Lưu ý, không di chuyển thẻ cho đến khi tất cả các thông tin được hiển thị.
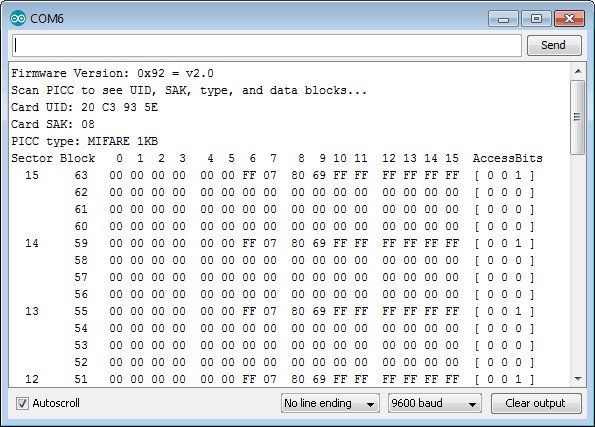
Bố cục bộ nhớ MIFARE Classic 1K
MIFARE Classic 1K là một loại thẻ RFID được sử dụng phổ biến trong các ứng dụng thẻ thông minh và hệ thống điều khiển truy cập. Nó có dung lượng bộ nhớ 1 kilobyte (1024 bytes) và được chia thành các khối (blocks) và phân đoạn (sectors).
Dung lượng bộ nhớ: MIFARE Classic 1K có tổng cộng 16 phân đoạn, mỗi phân đoạn chứa 4 khối, mỗi khối chứa 16 byte. Do đó, tổng dung lượng bộ nhớ là 16 phân đoạn x 4 khối x 16 byte = 1024 byte.
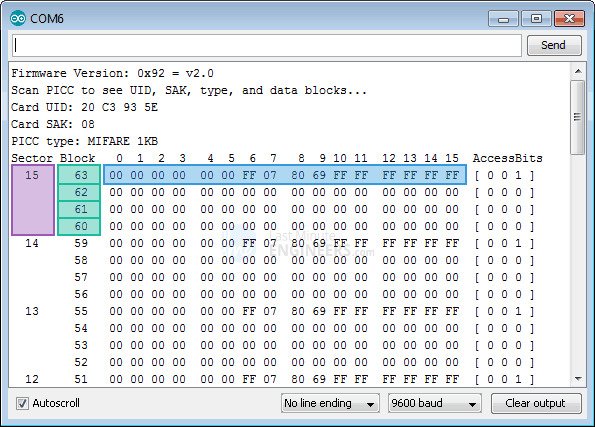
Phân đoạn (Sectors): Mỗi phân đoạn chứa 4 khối dữ liệu và một khối chứa thông tin định danh (trailer block). Số thứ tự của phân đoạn được đánh từ 0 đến 15.
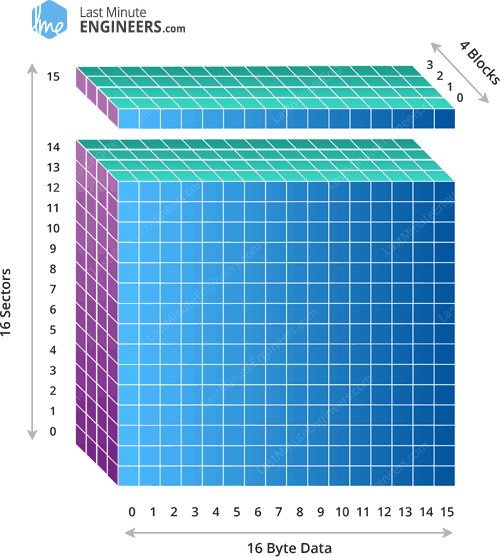
Khối (Blocks): Mỗi khối có kích thước 16 byte. Trong mỗi phân đoạn, có 3 khối dữ liệu và 1 khối trailer block. Khối trailer chứa thông tin định danh, quản lý quyền truy cập và khóa.
Truy cập và bảo vệ dữ liệu: Mỗi khối có thể được bảo vệ bằng một khóa (key). Chỉ những người có khóa chính (key A hoặc key B) mới có thể truy cập và ghi dữ liệu vào khối. Quyền truy cập và quản lý khóa được quản lý thông qua khối trailer.
Phân chia quyền truy cập: Mỗi khối có thể được chia thành 2 phần với các quyền truy cập khác nhau, bao gồm quyền đọc, ghi và xóa.
Thông tin định danh (UID): Mỗi thẻ MIFARE Classic 1K có một số ID duy nhất (UID) 4 byte được sử dụng để xác định thẻ.
Code: Đọc và ghi dữ liệu từ thẻ RFID sử dụng module RC522
Đoạn code bên dưới có chức năng đọc và ghi dữ liệu từ module RFID RC522 bằng Arduino Uno.
#include <SPI.h>      //include the SPI bus library
#include <MFRC522.h>  //include the RFID reader library

#define SS_PIN 10  //slave select pin
#define RST_PIN 5  //reset pin

MFRC522 mfrc522(SS_PIN, RST_PIN);  // instatiate a MFRC522 reader object.
MFRC522::MIFARE_Key key;          //create a MIFARE_Key struct named 'key', which will hold the card information

//this is the block number we will write into and then read.
int block=2;

byte blockcontent[16] = {"Last-Minute-Engg"};  //an array with 16 bytes to be written into one of the 64 card blocks is defined
//byte blockcontent[16] = {0,0,0,0,0,0,0,0,0,0,0,0,0,0,0,0};  //all zeros. This can be used to delete a block.

//This array is used for reading out a block.
byte readbackblock[18];

void setup()
{
    Serial.begin(9600);        // Initialize serial communications with the PC
    SPI.begin();               // Init SPI bus
    mfrc522.PCD_Init();        // Init MFRC522 card (in case you wonder what PCD means: proximity coupling device)
    Serial.println("Scan a MIFARE Classic card");

  // Prepare the security key for the read and write functions.
  for (byte i = 0; i < 6; i++) {
    key.keyByte[i] = 0xFF;  //keyByte is defined in the "MIFARE_Key" 'struct' definition in the .h file of the library
  }
}

void loop()
{
  // Look for new cards
  if ( ! mfrc522.PICC_IsNewCardPresent()) {
    return;
  }

  // Select one of the cards
  if ( ! mfrc522.PICC_ReadCardSerial())
  {
    return;
  }
    Serial.println("card selected");

   //the blockcontent array is written into the card block
   writeBlock(block, blockcontent);

   //read the block back
   readBlock(block, readbackblock);
   //uncomment below line if you want to see the entire 1k memory with the block written into it.
   //mfrc522.PICC_DumpToSerial(&(mfrc522.uid));

   //print the block contents
   Serial.print("read block: ");
   for (int j=0 ; j<16 ; j++)
   {
     Serial.write (readbackblock[j]);
   }
   Serial.println("");
}


//Write specific block
int writeBlock(int blockNumber, byte arrayAddress[])
{
  //this makes sure that we only write into data blocks. Every 4th block is a trailer block for the access/security info.
  int largestModulo4Number=blockNumber/4*4;
  int trailerBlock=largestModulo4Number+3;//determine trailer block for the sector
  if (blockNumber > 2 && (blockNumber+1)%4 == 0){Serial.print(blockNumber);Serial.println(" is a trailer block:");return 2;}
  Serial.print(blockNumber);
  Serial.println(" is a data block:");

  //authentication of the desired block for access
  byte status = mfrc522.PCD_Authenticate(MFRC522::PICC_CMD_MF_AUTH_KEY_A, trailerBlock, &key, &(mfrc522.uid));
  if (status != MFRC522::STATUS_OK) {
         Serial.print("PCD_Authenticate() failed: ");
         Serial.println(mfrc522.GetStatusCodeName(status));
         return 3;//return "3" as error message
  }

  //writing the block
  status = mfrc522.MIFARE_Write(blockNumber, arrayAddress, 16);
  //status = mfrc522.MIFARE_Write(9, value1Block, 16);
  if (status != MFRC522::STATUS_OK) {
           Serial.print("MIFARE_Write() failed: ");
           Serial.println(mfrc522.GetStatusCodeName(status));
           return 4;//return "4" as error message
  }
  Serial.println("block was written");
}


//Read specific block
int readBlock(int blockNumber, byte arrayAddress[])
{
  int largestModulo4Number=blockNumber/4*4;
  int trailerBlock=largestModulo4Number+3;//determine trailer block for the sector

  //authentication of the desired block for access
  byte status = mfrc522.PCD_Authenticate(MFRC522::PICC_CMD_MF_AUTH_KEY_A, trailerBlock, &key, &(mfrc522.uid));

  if (status != MFRC522::STATUS_OK) {
         Serial.print("PCD_Authenticate() failed (read): ");
         Serial.println(mfrc522.GetStatusCodeName(status));
         return 3;//return "3" as error message
  }

//reading a block
byte buffersize = 18;//we need to define a variable with the read buffer size, since the MIFARE_Read method below needs a pointer to the variable that contains the size...
status = mfrc522.MIFARE_Read(blockNumber, arrayAddress, &buffersize);//&buffersize is a pointer to the buffersize variable; MIFARE_Read requires a pointer instead of just a number
  if (status != MFRC522::STATUS_OK) {
          Serial.print("MIFARE_read() failed: ");
          Serial.println(mfrc522.GetStatusCodeName(status));
          return 4;//return "4" as error message
  }
  Serial.println("block was read");
}
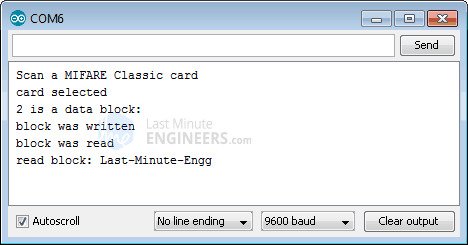
Sau khi nạp code và tiến hành quét thẻ thì thông tin hiển thị sẽ như thế này.
Giải thích Code
#include <SPI.h>      //include the SPI bus library
#include <MFRC522.h>  //include the RFID reader library
Khai báo và include các thư viện cần thiết để sử dụng module RFID Arduino.
#define SS_PIN 10  //slave select pin
#define RST_PIN 5  //reset pin
Định nghĩa các chân kết nối với module RFID RC522 trên Arduino Uno.
MFRC522 mfrc522(SS_PIN, RST_PIN);  // instatiate a MFRC522 reader object.
MFRC522::MIFARE_Key key;          //create a MIFARE_Key struct named 'key', which will hold the card information
Khởi tạo đối tượng mfrc522 để sử dụng các phương thức của module RFID.
//this is the block number we will write into and then read.
int block=2;

byte blockcontent[16] = {"Last-Minute-Engg"};  //an array with 16 bytes to be written into one of the 64 card blocks is defined
//byte blockcontent[16] = {0,0,0,0,0,0,0,0,0,0,0,0,0,0,0,0};  //all zeros. This can be used to delete a block.

//This array is used for reading out a block.
byte readbackblock[18];
Khai báo một cấu trúc MIFARE_Key để lưu trữ thông tin định danh của thẻ.
void setup()
{
    Serial.begin(9600);        // Initialize serial communications with the PC
    SPI.begin();               // Init SPI bus
    mfrc522.PCD_Init();        // Init MFRC522 card (in case you wonder what PCD means: proximity coupling device)
    Serial.println("Scan a MIFARE Classic card");

  // Prepare the security key for the read and write functions.
  for (byte i = 0; i < 6; i++) {
    key.keyByte[i] = 0xFF;  //keyByte is defined in the "MIFARE_Key" 'struct' definition in the .h file of the library
  }
}
Hàm setup() được gọi một lần khi Arduino khởi động. Nó khởi tạo các cài đặt ban đầu cho module RFID RC522 và khóa truy cập (key) cho việc đọc và ghi dữ liệu.
void loop()
{
  // Look for new cards
  if ( ! mfrc522.PICC_IsNewCardPresent()) {
    return;
  }

  // Select one of the cards
  if ( ! mfrc522.PICC_ReadCardSerial())
  {
    return;
  }
    Serial.println("card selected");

   //the blockcontent array is written into the card block
   writeBlock(block, blockcontent);

   //read the block back
   readBlock(block, readbackblock);
   //uncomment below line if you want to see the entire 1k memory with the block written into it.
   //mfrc522.PICC_DumpToSerial(&(mfrc522.uid));

   //print the block contents
   Serial.print("read block: ");
   for (int j=0 ; j<16 ; j++)
   {
     Serial.write (readbackblock[j]);
   }
   Serial.println("");
}
Hàm loop() được lặp lại liên tục sau khi khởi động. Nó kiểm tra xem có thẻ RFID Arduino nằm trong phạm vi hoạt động của module hay không. Nếu có, nó tiến hành ghi dữ liệu vào khối và đọc lại khối đó. Sau đó, nội dung của khối được in ra trên cổng Serial.
//Write specific block
int writeBlock(int blockNumber, byte arrayAddress[])
{
  //this makes sure that we only write into data blocks. Every 4th block is a trailer block for the access/security info.
  int largestModulo4Number=blockNumber/4*4;
  int trailerBlock=largestModulo4Number+3;//determine trailer block for the sector
  if (blockNumber > 2 && (blockNumber+1)%4 == 0){Serial.print(blockNumber);Serial.println(" is a trailer block:");return 2;}
  Serial.print(blockNumber);
  Serial.println(" is a data block:");

  //authentication of the desired block for access
  byte status = mfrc522.PCD_Authenticate(MFRC522::PICC_CMD_MF_AUTH_KEY_A, trailerBlock, &key, &(mfrc522.uid));
  if (status != MFRC522::STATUS_OK) {
         Serial.print("PCD_Authenticate() failed: ");
         Serial.println(mfrc522.GetStatusCodeName(status));
         return 3;//return "3" as error message
  }

  //writing the block
  status = mfrc522.MIFARE_Write(blockNumber, arrayAddress, 16);
  //status = mfrc522.MIFARE_Write(9, value1Block, 16);
  if (status != MFRC522::STATUS_OK) {
           Serial.print("MIFARE_Write() failed: ");
           Serial.println(mfrc522.GetStatusCodeName(status));
           return 4;//return "4" as error message
  }
  Serial.println("block was written");
}
Hàm writeBlock(): Hàm này được sử dụng để ghi dữ liệu vào một khối cụ thể trên thẻ RFID. Trước khi ghi dữ liệu, hàm xác thực quyền truy cập vào khối và sau đó thực hiện việc ghi dữ liệu vào khối đó.
//Read specific block
int readBlock(int blockNumber, byte arrayAddress[])
{
  int largestModulo4Number=blockNumber/4*4;
  int trailerBlock=largestModulo4Number+3;//determine trailer block for the sector

  //authentication of the desired block for access
  byte status = mfrc522.PCD_Authenticate(MFRC522::PICC_CMD_MF_AUTH_KEY_A, trailerBlock, &key, &(mfrc522.uid));

  if (status != MFRC522::STATUS_OK) {
         Serial.print("PCD_Authenticate() failed (read): ");
         Serial.println(mfrc522.GetStatusCodeName(status));
         return 3;//return "3" as error message
  }

//reading a block
byte buffersize = 18;//we need to define a variable with the read buffer size, since the MIFARE_Read method below needs a pointer to the variable that contains the size...
status = mfrc522.MIFARE_Read(blockNumber, arrayAddress, &buffersize);//&buffersize is a pointer to the buffersize variable; MIFARE_Read requires a pointer instead of just a number
  if (status != MFRC522::STATUS_OK) {
          Serial.print("MIFARE_read() failed: ");
          Serial.println(mfrc522.GetStatusCodeName(status));
          return 4;//return "4" as error message
  }
  Serial.println("block was read");
}
Hàm readBlock(): Hàm này được sử dụng để đọc dữ liệu từ một khối cụ thể trên thẻ RFID. Trước khi đọc dữ liệu, hàm xác thực quyền truy cập vào khối và sau đó thực hiện việc đọc dữ liệu từ khối đó.
CODE RAT TOT